Did you just wake up from your denial and admit that you can’t put off cleaning your laptop keyboard any longer?
You might have felt cowed down by this seemingly enormous task. Cleaning electronics scares the bravest of all.
But it’s important that you tackle this task to extend the life of your laptop and maintain a hygienic surface for the continual contact with your hands.
Some studies claim that your keyboard may harbor more germs than a toilet seat. Disgusting, right? Habits that are less than sanitary and poor personal hygiene contribute heavily to a buildup of germs on your keyboard. If you use your laptop for multiple hours every day, then your keyboard deserves a thorough cleaning every once in a while.
Dust accumulation is something that you can’t fully prevent, but numerous other factors contribute to your keyboard getting dirty. Dirt and oil from your skin also accumulates on the keyboard.
Eating while working on your laptop is a habit that should be avoided in earnest, as you are essentially bombarding your keyboard with an assortment of food crumbs. Drinks should also be kept a clear distance from your laptop to avoid spills that can seep down between the keys.
Now that you are convinced that your keyboard needs cleaning and have made up your mind to do it, let’s get started. You may seek the help of a commercial cleaner. But doing it yourself with simple ingredients you probably have on hand will be easier, cheaper, hassle-free and non-toxic.
This ‘how to’ lays out the steps to help you safely clean your laptop keyboard in the easiest way possible.

Contents
- Steps to Clean and Sanitize Your Laptop Keyboard
- Step 1. Turn off the laptop
- Step 2. Blow out loose dust
- Step 3. Dip a cotton swab in rubbing alcohol
- Step 4. Clean the surface and ridges of the keys
- Step 5. Wipe the surface with a lint-free cloth
- Step 6. Cover a waxing knife with a microfiber cloth
- Step 7. Dip the covered knife in white vinegar
- Step 8. Deep clean between the keys
- Step 9. Give the keyboard a final wipe down
- Additional Tips
Steps to Clean and Sanitize Your Laptop Keyboard
Things you’ll need:

- Blow dryer
- Rubbing alcohol
- Cotton swabs
- Lint-free towel
- Eyeglass cleaning microfiber cloth
- Waxing knife
- Microfiber towel
- White vinegar
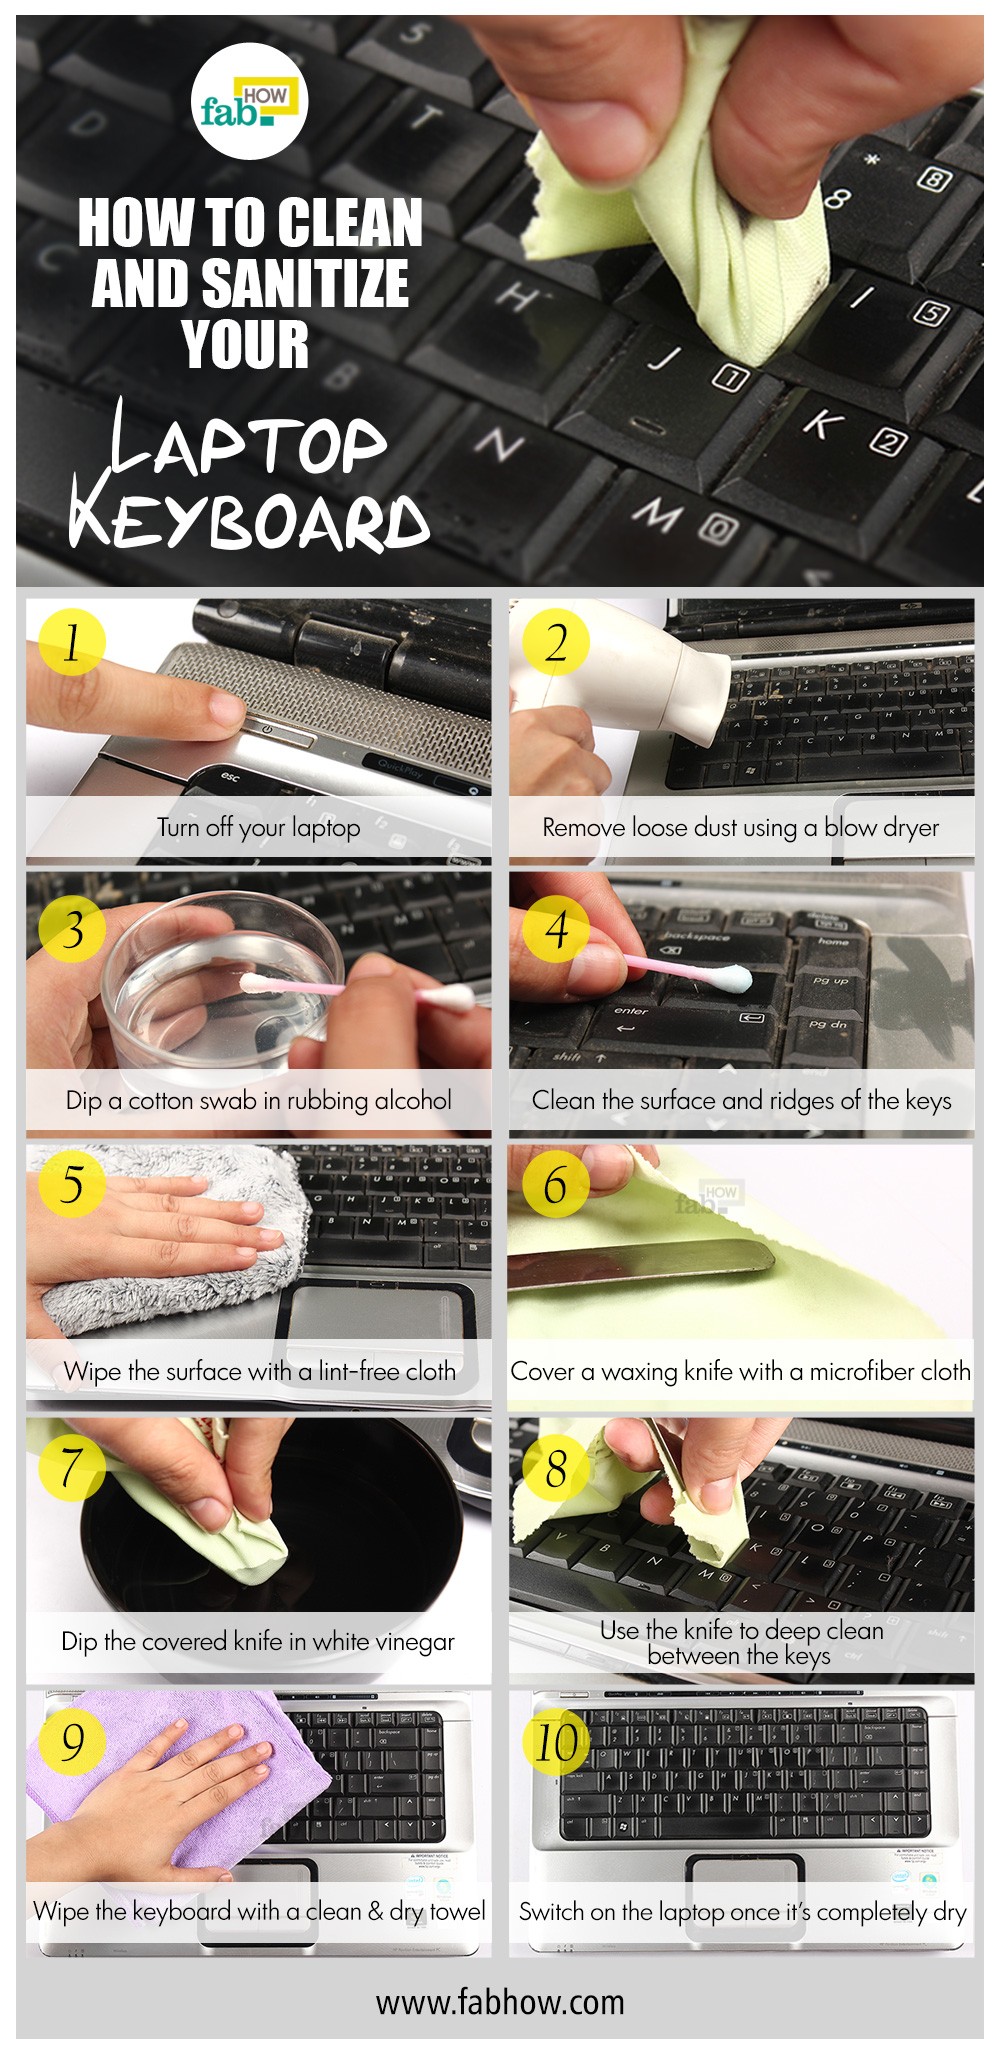
Step 1. Turn off the laptop

Turn off your laptop before you start cleaning it. Cleaning the keyboard while your laptop is powered on can be hazardous to you as well as your computer.
Step 2. Blow out loose dust

Even if you are in a habit of regularly dusting your keyboard, there is a lot of loose dust and debris lodged just below and around the keys. Using a blow dryer is a good way to blow that dirt out.
Point the dryer directly at the ridges and crevices to force out loose debris as well as dust bunnies.
Step 3. Dip a cotton swab in rubbing alcohol

Dip a cotton swab in rubbing alcohol. Rubbing alcohol is an efficient means to disinfect and sanitize your keyboard.
It also cuts through the grease efficiently.
Step 4. Clean the surface and ridges of the keys

Use the damp cotton swab to clean the surface of the keys.

Clean the ridges between them as well.
Move from key to key, either by rows or columns, in a systematic manner. This should ensure that you clean all the keys without missing any.
If the cotton swab gets quite dirty, dip a new one in rubbing alcohol and continue cleaning.
Step 5. Wipe the surface with a lint-free cloth

After you’re done disinfecting the keys with rubbing alcohol, wipe the entire surface with a lint-free towel.
Step 6. Cover a waxing knife with a microfiber cloth

Fold a layer of a microfiber cloth over a waxing knife. The microfiber cloth that comes with your eyeglasses is a good choice.
You may use any thin, flat tool that is similar to a waxing knife.
Step 7. Dip the covered knife in white vinegar

Dip the knife covered by the microfiber cloth in white vinegar. Ensure that the cloth is only slightly wet. Any amount of dripping moisture should be avoided.
Step 8. Deep clean between the keys

Insert the knife covered by the damp microfiber cloth between the keys. Move it into the ridges to clean out as much grime as you can from under the keys.
Step 9. Give the keyboard a final wipe down

When you think you’ve reached a personal level of perfection in cleaning under the keys, give your keyboard a final wipe with a clean and dry lint-free towel.

Be sure that your keyboard is completely dry before powering on the laptop.
Additional Tips
- Always shut down the laptop before cleaning. While moisture may damage the keyboard, even dusting while your system is on can lead to trouble. You may accidently press a key or combination of keys.
- Be sure to use isopropyl alcohol rather than ethyl alcohol, as ethyl alcohol may end up erasing the lettering on the keys.
- If using a knife other than a waxing knife, always use one with a blunt blade for the extensive cleaning. Using a sharp knife leaves open the possibility of cutting yourself.
- If you’ve spilled something on your keyboard, power off the laptop immediately and remove the battery. Shake out all the liquid and dry it off immediately with a cloth.
Summary of How to Clean Your Laptop Keyboard
Download this infographic.