Learning your way around a new computer can be a harrowing task for the first couple of weeks, especially if you switch from a Windows PC to a Mac. It may seem trivial, but taking a screenshot is one of the essential tasks that you must learn early on.
As you begin exploring your Mac, knowing how to take a screenshot will come in handy, especially if you run into problems and need help from tech support. If you have a screenshot of the problem, it will save you from trying to explain something you don’t fully understand.
A screenshot is a multifaceted tool to help you out in many tricky situations. You may want to flaunt your high score on a game or capture an embarrassing conversation with your friend to be used as leverage in getting your assignment completed. However, the latter requires extreme flexibility in morals along with the knowledge of taking a screenshot in Mac.
Thankfully, in a Mac, there are multiple ways to take a screenshot and they are easy enough to understand.
Contents
- Method 1: Take a Screenshot of the Entire Screen
- Method 2: Take a Screenshot of a Portion of the Screen
- Method 3: Take a Screenshot of a Window
- Method 4: Take a Screenshot via Grab Application
Method 1: Take a Screenshot of the Entire Screen
Step 1. Open the window you want to capture

Open the application or window that you want to take a screenshot of. If multiple windows are open, make sure it is in the forefront.
Step 2. Press Command + Shift + 3

Press the keyboard shortcut “Command + Shift + 3”. (Remember, with keyboard shortcuts, you have to hold all the keys down at the same time.) If your computer’s sound is on, you will hear a camera shutter sound indicating that your entire screen has been captured and the image is saved on the desktop.
Step 3. The screenshot is saved

The image is automatically saved on the desktop with the default file name ‘Screenshot [date] at [time]’. Also, it will be saved by default in PNG format.
Step 4. Use the screenshot
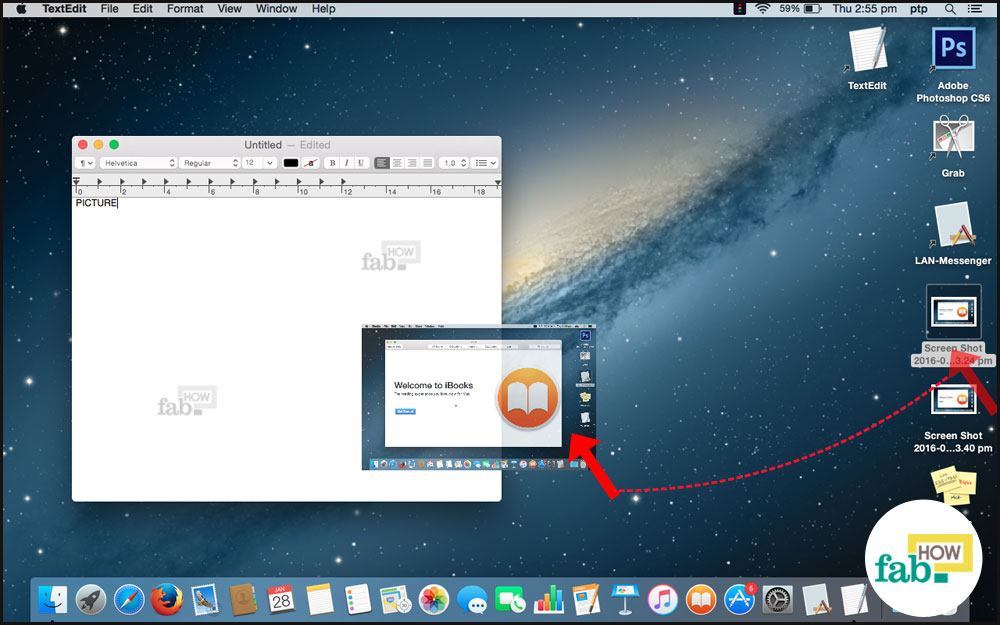

Your screenshot is ready to be used in a text/photo editor application, attached to an email, uploaded to the Internet, etc. The screenshot will open by default in the Preview application.
Copy screenshot of entire screen to clipboard
To bypass the image being saved to your desktop by default, you can take a screenshot and place it directly into a document or picture-compatible application by copying it to the clipboard.
1. Press Command + Control + Shift + 3

Press the keyboard shortcut “Command + Control + Shift + 3” and you will hear a camera shutter sound if the sound is not on mute. It will indicate that the screenshot has been taken and saved on the clipboard.
2. Use the screenshot


Open an application that is compatible with pictures like a text or picture editor. With your cursor inside the application window, you can either right-click and select “Paste” from the drop-down menu or press Command + V to paste in the screenshot.
Method 2: Take a Screenshot of a Portion of the Screen
Step 1. Open the window you want to capture
Open the application or window that you want to take a screenshot of.
Step 2. Press Command + Shift + 4

Press the keyboard shortcut “Command + Shift + 4”.

The mouse pointer will change to crosshairs with the coordinates of the location written at the bottom right of the crosshair. These coordinates are the location of the point corresponding to the top right corner of the screen, which is the origin. They represent the number of pixels (width x height) from the top right corner to that point.
Step 3. Click and drag to select the area

Place the crosshairs on the edge of the area that you want to screenshot. Now, left click and drag the crosshair icon to create a box around the area you want. The selected portion will appear inside a grayish window with a white border.
If there is a particular dimension in the selection you require, that too can be done in a Mac. Once you start selecting the area by dragging the crosshair, the number of pixels you have selected will appear in the bottom right of the crosshair in the form of width x height. You can make the desired selection.
As soon as you stop your selection process and release the left click, you’ll hear a camera shutter sound and your screenshot will be taken and saved on the desktop.
Step 4. The screenshot is saved
Your screenshot is stored on the desktop. The filename will be ‘Screenshot [date] at [time]’ and the file type will be PNG.
Step 5. Use the screenshot

Now you are free to use the screenshot as needed. By default, the screenshot will open in the Preview application from where you can copy it and paste it into the destination. You can open the file directly or drag it into the application window.
Copy screenshot of selected area to clipboard
To bypass the image being saved to your desktop by default, you can take a screenshot and place it directly into a document or picture-compatible application by copying it to the clipboard.
1. Press Command + Control + Shift + 4

Press the keyboard shortcut “Command + Control + Shift + 4”.

Now you can click and drag to make the desired selection. To fine tune your selection, you can use the techniques mentioned above. They will work with this shortcut, too.
Once you’ve made your selection, you will hear a camera shutter sound if the sound is not on mute. It will indicate that the screenshot has been taken and saved on the clipboard.
2. Use the screenshot
Open an application that is compatible with pictures like a text or picture editor application. Inside the application window, right-click and select “Paste” from the drop-down menu or press Command + V to paste in the screenshot.
Different Selection Techniques
Sometimes, manually selecting the area does not capture exactly what you expected or need. Mac offers several selection techniques that might help you in making a precise manual selection of the area for the screenshot.
Remember, these techniques come into play after the mouse pointer has turned into a crosshair symbol, that is after you press “Command + Shift + 4”.
a) Expand selection evenly in all directions

Hold the “Option” key to expand your selection proportionately in all directions from the center.

As you drag the crosshair in one direction, it will automatically expand your selection by the same amount in the opposite direction.
b) Lock the direction of selection

Hold the “Shift” key to lock the vertical and horizontal selection.


While making a selection, press and hold the “Shift” key and move the crosshair horizontally. It will automatically lock the vertical boundary or the height of the selection and vice-versa.
c) Move the selection with locked dimensions

Hold the “Spacebar” key to move selected portion while locking the aspect ratio.

If you have made a selection and held the “Spacebar” down, it will lock the width and height of the selection. Now, you are free to move this selection to any part of the screen.
d) Lock the direction of movement of the selection

Hold the “Shift + Spacebar” keys to lock movement in the horizontal or vertical direction.


While making a selection, press and hold “Shift + Spacebar” keys and move the selection either horizontally or vertically. The selection area will move in the desired path and the movement in the opposite direction will be locked.
e) Cancel the selection


In the middle of making a selection, if you feel that it is not what you want, you can cancel that selection by pressing the “Esc” (escape) key before releasing the mouse button. Since you make the selection by holding the mouse button and the screenshot is captured as soon as you release it, the “Esc” key must be pressed before releasing the mouse button.