Fleshy, juicy and succulent – tomatoes are a favorite and most commonly grown in gardens around the world. Despite its popularity among gardeners, novices tend to have a harder time producing good results. But don’t be discouraged.
There’s a host of varieties of tomatoes available for growing. You can easily choose a variety that will do well in the growing conditions you are able to provide.
There are a lot of ways you can go wrong with tomatoes, but consistent and even moisture along with ample sunlight, say 8 hours a day, go a long way toward a healthy harvest. Introducing natural enemies also helps keep pests in check.
Keeping in mind the soil requirements also helps the plant’s health. Tomatoes grow well in slightly acidic soil. Choose a soil that has not been planted with peppers or eggplants for at least 2 years. Belonging to the same nightshade family, peppers, eggplants and tomatoes harbor similar diseases in soil.
Tomatoes are a treasure trove when it comes to antioxidants. This makes them beneficial for heart health. They also support good bone health and boast anticancer benefits. Plus, they are rich in vitamins C and K.
Despite being hard work, a good yield from your tomato plant is its own reward. So, give it a try. Growing tomatoes in a pot will not only save gardening space, but also provide you and your family with organic tomatoes.
Contents
- Steps to Grow Tomatoes in a Pot
- Step 1. Fill the germination tray with potting mix
- Step 2. Sow the seeds
- Step 3. Water the tray
- Step 4. Cover with a mulching sheet
- Step 5. Monitor the germination process and seedling growth
- Step 6. Prepare the soil for transplanting the seedling
- Step 7. Line the bottom of the pot with a few stones
- Step 8. Fill the pot with the prepared soil
- Step 9. Carefully remove a seedling from the germination tray
- Step 10. Transplant the seedling in the pot
- Step 11. Water and label the plant
- Step 12. Monitor the progress of your plant
- Step 13. Harvest the tomatoes when ripe
- Tips for growing tomatoes in a pot
Steps to Grow Tomatoes in a Pot
Things you’ll need for germinating seeds:

- Potting mix
- Germination tray
- Gloves
- Small wooden stick
- Garden pressure spray pump
- Hand trowel
- Seeds
- Garden label
- Mulching sheet
Things you’ll need for transplanting:

- Fertile soil
- A pot and a few stones
- Vermicompost or any other organic compost
- Gloves
- Garden pressure spray pump
- Small Wooden stick
Step 1. Fill the germination tray with potting mix

Start by filling your germination tray with potting mix. Fill the tray up to brim.
Step 2. Sow the seeds

Use a small stick to make a ½ inch deep hole in the potting mix of each slot in the tray. Put a few seeds in each hole. Cover the holes with the potting mix.
Step 3. Water the tray

Thoroughly water the potting mix in the tray. Label the tray in order to distinguish it from other germinating seeds.
Step 4. Cover with a mulching sheet
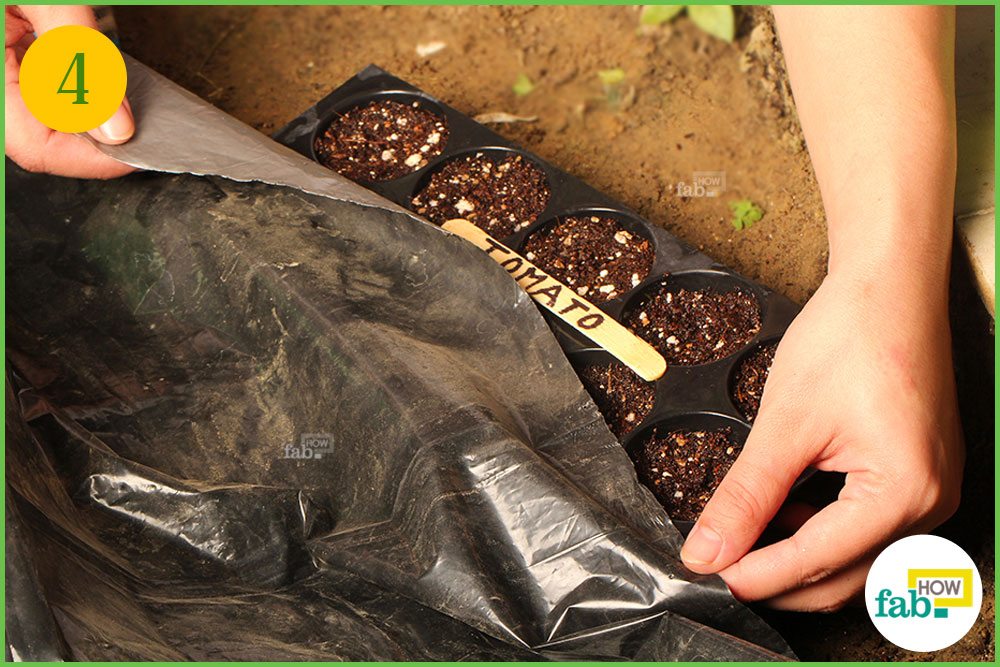
Cover the tray with a mulching sheet. Be sure to have the light side of the sheet facing the potting mix. The dark side of the sheet should be exposed.
Tomatoes love sunlight, but not so much during the germination process. The mulching sheet checks the amount of light reaching the seeds while still maintaining the temperature. Remove the mulching sheet after germination.
Step 5. Monitor the germination process and seedling growth

The best temperature range to facilitate germination is 75° to 90° F, but the lower range during germination may extend down to 60° F. It takes about a week for the seedlings to emerge. Once the seedlings emerge, move the germination tray to a sunny spot.
In this instance, the seedlings became mature for transplanting in about 3 weeks. Keep the soil thoroughly moist during the development of the seedlings.
Step 6. Prepare the soil for transplanting the seedling

Tomatoes prefer a fertile soil that’s rich in organic matter with good drainage. The best choices are clays and loams. Be informed that tomatoes like slightly acidic soil (6.0 to 6.8 pH), but they can tolerate as low as a 5.5 pH level of acidity in the soil.
Combine 2 parts fertile soil with 3 parts compost. Work the soil loose and lump free with your hands.
Step 7. Line the bottom of the pot with a few stones

Select a big pot that facilitates good drainage. Line the holes at the bottom of the pot with a few stones.
Step 8. Fill the pot with the prepared soil

Fill the pot with the prepared soil, leaving 1 to 2 inches from the rim so that your pot doesn’t overflow after watering.
Step 9. Carefully remove a seedling from the germination tray

Using a wooden stick, remove a seedling carefully from the germination tray. Insert the stick beneath the roots, then gently push upward without stressing the roots.
Step 10. Transplant the seedling in the pot

Make a deep hole in the soil in the pot. Set the seedling gently inside the hole. Fill the hole with soil, burying the roots and lower stem. Make sure you are only planting a single plant per pot, tomatoes do not like to be crowded.
Also, keep a check if your seedling is in an upright position, if you don’t want it to grow askew like “the Leaning Tower of Pisa”!
Step 11. Water and label the plant

Two things that tomatoes absolutely love are lots of sun and ample water. But no plant likes a waterlogged soil bed.
So, water your seedling liberally, but maintain consistent moisture. Label the plant for your own convenience.
Step 12. Monitor the progress of your plant

Tomatoes need 8 hours of sunshine daily, so be sure to move your pot to an area that receives sunlight most of the time. Wise gardeners also decide on plant support early on. Staking or a metal tomato cage from the garden center are good options for pots. Stake the tomatoes when they start growing tall. It is better to support plants while they are still on the smaller side so they can grow with the support of the stake or tomato cage.

Take special care after the plants bear canary yellow blooms. Steep temperature changes during setting of the fruit may cause even healthy blossoms to drop. Most diseases (blossom end rot) and problems like fruit splits can be controlled by balanced watering. While watering, don’t wet the foliage of plants affected with blight or wilt.

Once small green fruits appear, stay on the lookout for fat green hornworms that love to feed on foliage and fruits. Introduce natural enemies like wasps in your garden. Handpicking and destroying larvae reduces hornworms and beetles.
Step 13. Harvest the tomatoes when ripe

A change in color is the most prominent indicator of the ripening of the fruit. Hold the stem in one hand and the fruit in the other and gently break off the stem. Ripe tomatoes should be firm to touch, but neither too hard nor too soft.
Picking off ripe tomatoes also relieves the plant from the stress, giving the remaining fruits a better chance. Do not wait too long to harvest the tomatoes, and always pick right away after a heavy rain so they do not crack and burst. For best flavor, do not store in the refrigerator.

Tips for growing tomatoes in a pot
- With tomatoes, you can never go wrong with planting deep. While transplanting the seedlings, plant them as deep as possible. The hairs on the stem develop into roots, which help build a strong root system.
- If the seedlings are too leggy, bury the bulk of the stem’s length in the soil. This will help the seedling develop a steady root system.
- Avoid removing leaves that shelter the fruits. This shade prevents the fruits from scalding.
- If there is a pest problem, use netting to protect the plant from insects at an early stage.
- Coffee may be used to increase acidity in the soil as well as kill slugs and pests since it acts a poison for them.
- Placing eggshells around the roots helps deter slugs. You may also put eggshells in your compost to make it rich in calcium.
- Putting a whole raw egg under your tomato plant can help boost calcium and potassium levels in the soil, thus protecting the plant from blossom end rot.
- Avoid planting tomatoes in the same spot as that of peppers and eggplants. They all belong to the same nightshade family and hence are susceptible to similar diseases.
- When the weather cools down, the plants may bear green fruits again. Since these fruits won’t get a chance to ripen, pick them green. You can use them to make sauces or chutneys.
Summary of How to Grow Tomatoes in a Pot

Download this infographic.
Where can I get seeds for summer vegetables for
Pots for apartment