Scratched discs can be a big turn off if you are planning to binge watch the Star Wars saga or play Skyrim on your gaming console.
Taking out the Star Wars box set after a while, you can expect a few additional scratches on the discs. If Episodes I, II and III have some scratches, I think you'll manage, but you’ve got to get them out of Episodes IV, V and VI.
Here is a DIY guide to remove those scratches, so your disc does not betray you when Han Solo is about to escape from the clutches of Jabba the Hutt.
Note: While there are a lot of home remedies available to fix a scratched disc, you must ensure that you have read the warnings on the disc, as some mild abrasives can damage the disc further. Also, these methods are not applicable to Blu-Ray discs, and for DVDs, you need to be extra careful while buffing and wiping the disc.
Contents
Assessing the Damage
Assess the damage on the disc before making a plan of action. Visual inspection is the best and the most practical method to do this.
- Check for concentric scratches in the disc, that is, abrasions that run concentric to the center of the disc. Vertical scratches, from the center to the edge moving radially outwards, hardly cause any effect on the reading.
- The lens reads the disc from the center and moves spirally outwards. Use this technique to locate the scratch by cross referencing with the time at which the playback interrupts.
- Deep scratches are not easy to mend and usually result in permanent damage. You can ascertain the level of damage by holding up the disc in the sunlight. If the light passes through the scratch, it is way too deep to mend.
- If the disc shows no visible signs of damage, check you disc player's lens or its mechanism for defects.
Backup Your Data
If you typically use discs to store data, including photos or other multimedia, consider whether you would want to fix the disc if it became scratched. If yes, then you’ll want to back up the data so if the disc gets damaged beyond repair, you won’t lose anything.
Initially, people would create data backup in additional disks. However, today a soft copy of the data in your computer is preferable.
If you are reading this article for information and your disc is not yet damaged, then backup its data now.
If the disc is damaged, then backup your disc after following any of the repair methods mentioned later in the article.
- After repairing the disc, use software like Nero or Daemon Tools to create an image of the disc. You’ll have the option to burn that image into a new disc or keep the soft copy of the image and use virtual drive software (Daemon Tools) to play that image.
- Image creation softwares have options to avoid reading bad sectors, which skips where the damage is excessive while creating a copy.
Method 1: Washing the Disc
The first step in dealing with a disc that isn’t playing correctly is to clean it. If the problem is from dust and grease on the disc, washing does the trick. It requires a cautious and gentle hand to remove any dirt or grease.
Things you’ll need:

- Lukewarm water in a bowl
- Mild liquid soap – ½ tablespoon
- Damaged disc
- Lint-free cloth
Step 1. Pour soap in water and mix the contents

Pour ½ tablespoon of mild liquid soap in the bowl of lukewarm water.
Mix the soap thoroughly in the water.
Step 2. Wash the disc

Now take an empty container (15 oz.) and fill it with soapy water from the bowl. Pour the soapy water top of the disc to clean off any dirt particles or grease.
You can use the same bowl as a base if you don’t have a sink nearby.
Step 3. Wipe and air dry the disc

Use a dry rouge or lint-free cloth and clean the surface of the disc radially, from the center to its edge. A rouge cloth, if available, is highly recommended.
Leave the disc in the room to air dry.
After it’s dry, check whether the disc works by putting it in a disc player. If it doesn’t, inspect further for scratches and follow the methods below.

Method 2: Polishing the Disc with Toothpaste
Toothpaste is widely considered the best possible way to repair a scratched disc. Its particles are so tiny that they buff the plastic layer of the disc and smooth out the scratch. The more you polish the scratch, the lesser are its chances of deviating the light from the disc reader.
Things you’ll need:

- Toothpaste
- Damaged disc
- Cotton cloth
- Lint free cloth
- Bowl of soap solution
Step 1. Apply toothpaste on a clean disc

Before applying toothpaste, clean any dirt or grease off the disc.
Put some toothpaste on a cotton cloth and apply a thin layer of it from the center to edge on the CD, along its radius.
Polish the disc consecutively in a similar manner with gentle hands. Pay heed to the areas where the scratches are centered.
Use white toothpaste, not a gel. It must not contain any kind of large abrasive particles. Apply it on an unimportant disc first and rub your fingers on it to check if it’s highly abrasive.
Step 3. Clean the toothpaste off the disc

If the toothpaste dries out, gently wipe the disc with a cloth dipped in lukewarm water. After that, wash the disc by pouring a soap solution on the disc.
Step 3. Wipe and air dry the disc

Wipe the toothpaste disc gently from the center to the edge in straight lines using a lint free cloth or a rouge cloth.
Now let the disc air dry for a while and it will be ready to be tested in your disc player.

Method 3: Polishing the Disc with Petroleum Jelly
Apart from toothpaste, the other popular method involves using petroleum jelly like Vaseline. Some people have used Brasso or wax polishes to the same effect. These polishes fill the scratch and reduce the unnecessary reflections.
Things you’ll need:

- Petroleum Jelly
- Damaged disc
- Lint-free cloth
- Bowl of soap solution
Step 1. Apply polish on a clean disc
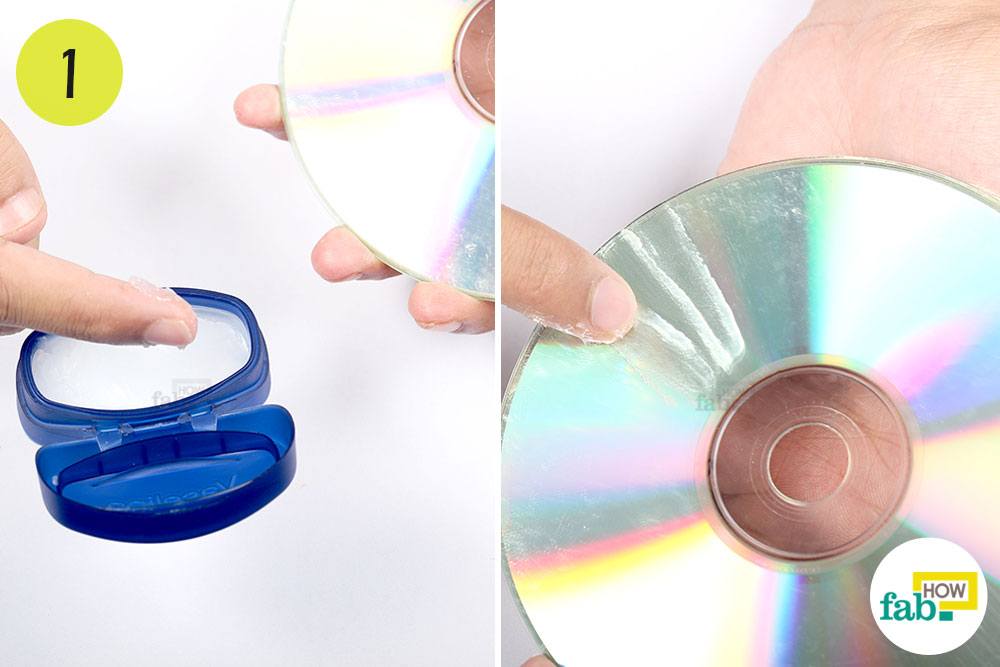
Before applying the petroleum jelly, clean off any dirt or grime from the disc.
Apply a thin layer of petroleum jelly from the center to edge on the disc, using your fingers. Keep in mind your hands must be clean.
Polish the disc consecutively in a similar manner with gentle hands. Pay attention to where the scratches are located.
Step 2. Leave the disc for 10 minutes

Just let the disc sit for 10 minutes. In that time, petroleum jelly will slowly seep into the crack.
Step 3. Wipe the disc and let it air dry

Wipe the jelly from the disc using a lint-free cloth. Wipe the disc along the radius, from the center to the edge in straight lines.
You’ll have to wipe the disc thoroughly from different sides of the cloth as it needs to be cleaned solely by wiping.
Now leave the disc to air dry for a while and then tested it in your disc player.

Method 4: Spend Money
If all your attempts have failed, yet you wish to resurrect the data from your scratched disc, spending a little cash is your last resort.
Go to a professional

There is no shame in seeking professional help. For there are many music and video store owners who possess sophisticated cleaning equipment that might do the required job. It typically costs about $5 or less to fix a disc, which is pretty low compared to losing the data forever.
Buy a scratched disc fixer

If you have a lot of discs to repair and $300 bucks to spare, you can purchase a machine that fixes a scratched disc. Although there are CD scratch remover machines as low as $27, the real effective ones are way more costly.
Additional Tips
- An important part that many tend to forget is to clean and dry off your hands first. Use rubber gloves if you have a pair.
- Data backup is the best way to avoid inconvenience in the future.
- Slot-loading disc players are undesirable to play a scratched disc. Tray-loading disc players are advisable.
- Using Mr. Clean Magic Eraser is an out-of-the-box method of cleaning compact discs. It is a mild scrubbing pad used for nominal household cleaning. Wet the pad a little and gently rub it on the surface of the disc from the center toward the edge. The material of the pad acts as a mild abrasive, smoothing out the scratch.
- If you are applying Brasso, avoid inhaling its fumes.
Hi there! I just wish to give an enormous thumbs up for the nice info youve correct here on this post. I shall be coming once more to your blog for extra soon.