Cabbage is an ideal crop for your cool-season garden. Both green and red varieties are among the most productive fall vegetables. Nutritious and dependable growers, cabbages are packed with multiple health benefits. Although they can be planted in the spring, all types of cabbage grow best in the fall garden, improving in flavor after a light frost.
Contents
- Planting Tips
- Steps to Grow Cabbage in a Pot
- Step 1. Make a raised bed layered with compost & potting soil
- Step 2. Water the bed and cover with a mulching sheet
- Step 3. Monitor the seedling development
- Step 4. Prepare the pot for transplanting
- Step 5. Transfer the seedling
- Step 6. Carefully monitor the plant’s growth
- Step 7. Harvest timely
- Pest Prevention Tips
- Types of Cabbage
- Health Benefits
- Additional Tips
Planting Tips
As with any plant, success in growing cabbage depends on providing adequate growing conditions to promote strong, healthy growth. If you supply the rich soil with proper fertilization and irrigation that cabbage requires, you can expect successful results.
To produce a fall crop, start your cabbage seeds 12 to 14 weeks before the first fall frost. Transplant the seedlings to the pot when they are 4 to 6 weeks old.
Cabbage is a heavy feeder and therefore prefers rich soil. When planting the seeds out in your garden, amend the soil with 2 inches of organic compost. Be sure to water your seedlings gently but thoroughly.
As the small heads of cabbage begin to form, optionally feed the plants with an organic liquid fertilizer, preferably one that is high in nitrogen. Early morning is generally a good time to fertilize so that the plant foliage has the entire day to dry out. Wet foliage and leaves coupled with cold night temperatures may promote disease or fungus on most plants.
Heavy rain can cause cabbage heads to split. If possible, sever the roots on opposite sides of the cabbage with a sharp spade before the downpour to prevent damage to the vegetable.
Steps to Grow Cabbage in a Pot
Things you’ll need:
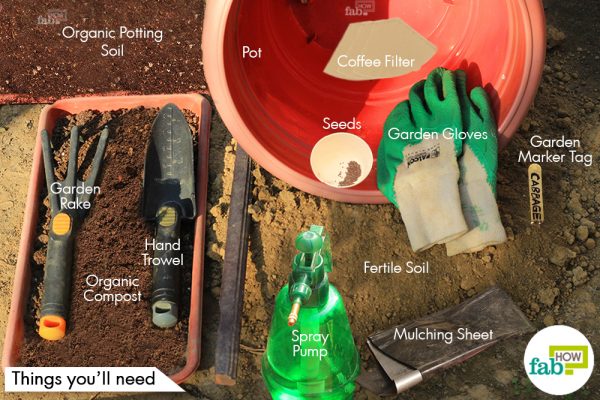
- Fertile soil
- Organic potting soil
- Hand Trowel
- Garden rake
- Organic compost
- Seeds
- Spray pump
- Coffee filters
- Mulching sheet
- Garden marker tag
- Large Pot
- Gloves
Step 1. Make a raised bed layered with compost & potting soil

Cabbage seeds are very small – the size of mustard seeds. They are dark or reddish brown. After choosing and purchasing your cabbage seeds, plant according to the directions on the seed packet or as steps mentioned below. Provide the recommended fertilization, sunlight, and watering requirements. Always choose organic and GMO-free seeds.
Choose a patch that receives abundant sunlight and prepare a raised bed in a fertile patch of soil. If your soil lacks fertility, you can add organic compost to make it fertile. Mix the soil and compost in a ratio of 2:3. Loosen the soil thoroughly with a rake or simply with your hands.
Spread the seeds over the prepared patch and cover it with a 1-inch layer of organic potting mix. The potting mix will facilitate germination as well as the early growth of seedlings.
Step 2. Water the bed and cover with a mulching sheet
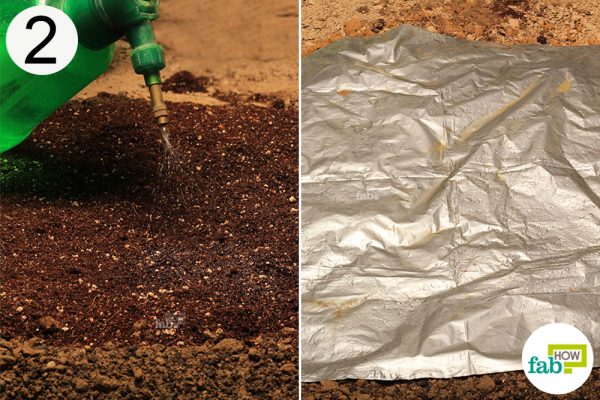
Water the soil bed generously without flooding it. Cover the patch with a mulching sheet. This facilitates germination of the seeds. Remove the sheet after germination, which can take 4 to 14 days.
Mulching sheets are used to modify the effects of the local climate in favor of your crop. It manipulates light, moisture, and temperature in favor of the plant.
Step 3. Monitor the seedling development
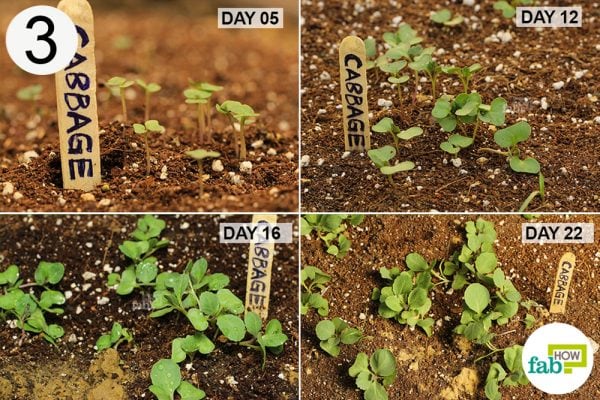
Cabbage can germinate in the temperature range of 40° to 75°F. The length of time for germination depends upon the temperature. The germination process is easy when the temperature is warmer (75°F). Be sure to maintain a consistent level of moisture in the soil.
The seedlings should be ready for transplanting in about 4 to 6 weeks. Consider the seedlings ready when they’ve grown 3 to 4 inches tall.
Step 4. Prepare the pot for transplanting

Step 5. Transfer the seedling
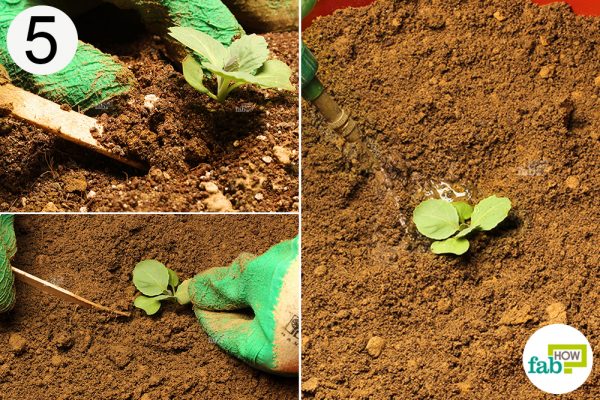
Push a wooden stick under a seedling and apply slight force upward. Draw the seedling out without harming the roots.
Make a small hole in the soil. Gently place the seedling in the hole and fill the hole with soil. Ensure that the seedling is planted upright and avoid compacting the soil around the seedling. Water it generously and mark the pot with a garden label.
It is recommended that you transplant the seedlings to a prepared pot at the appropriate time.
Step 6. Carefully monitor the plant’s growth
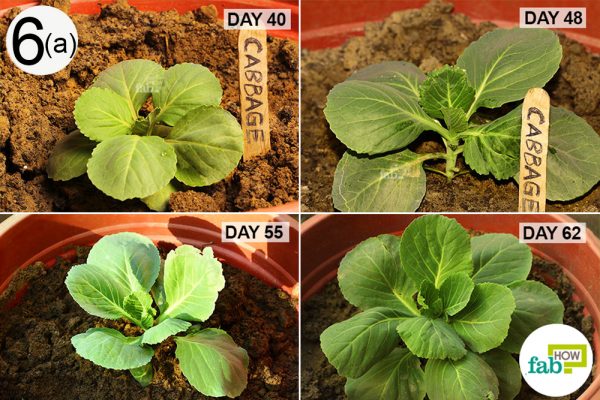
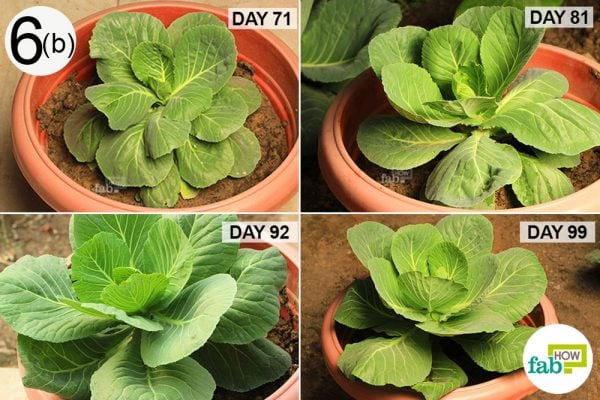

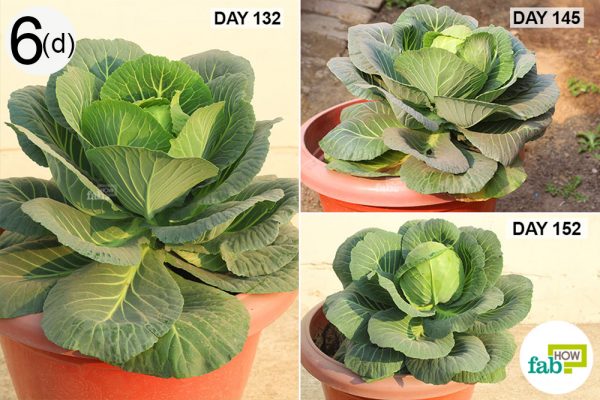
While cabbage is a cool-season crop, it requires at least 6 hours of sunlight daily. Although it can tolerate partial shade, it slows down the maturity of cabbage. In the absence of sun, the plants also tend to get leggy. When the heads begin to appear, you may optionally add liquid organic fertilizer if the soil requires more nitrogen.
Cabbage is a delicacy for a variety of pests. Slugs, snails, cabbage worms, cabbage loopers, aphids, and root maggots are some of the pests you’ll need to save your cabbage from in the early stage. Foliage damaged with holes indicates that pests are present.
Step 7. Harvest timely

Your cabbage is ready for harvest whenever a head appears, and it is firm to touch. Using a sharp knife or pruners, cut the head cleanly from the stem. If the weather remains favorable, you might be rewarded with some smaller secondary heads from the roots and remaining crown.

Pest Prevention Tips
Leaf-eating caterpillars, such as the green cabbage worm and cabbage looper, can wreak havoc on your crop. Inspect your plants daily, and if an infestation is discovered, attempt to handpick all pests immediately (although this is usually not the most effective means of control).
These pests are voracious eaters and can devour the leaves of your cabbage plants in no time. A biweekly spray of Bt (Bacillus thuringiensis) is extremely useful on cole crops (cabbage, broccoli, cauliflower, kale, turnip, etc.).
For decades organic gardeners and farmers have used Bt as an organic pesticide to effectively target caterpillars, such as the cabbage worm and cabbage looper. Coating all sides of the leaves with a fine spray is the most effective method because the caterpillar must eat the Bt for the pesticide to work.
Since Bt is not a broad-spectrum insecticide, it is a much safer system of pest control than other pesticides.
Types of Cabbage
Most green cabbage varieties vary greatly in size and number of days to maturity and harvest. The hybrid ‘Gonzales’ is a small cabbage variety more suitable for containers.
Red cabbage tends to be more nutrient dense due to its coloration. Two small varieties include ‘Red Express,’ an open-pollinated cultivar, and ‘Super Red 80,’ a smaller hybrid. Both would be satisfactory choices for container growing.
‘Savoy Cabbage,’ with its ornate, ruffled leaves, is a good pick for the fall garden. ‘Alcosa’ is an especially small hybrid that would fit nicely into a container. This variety is known for its sweetness after it’s exposed to some frost.
Health Benefits
Besides being rich in vitamins A and C, cabbage is also high in antioxidants, including flavonoid, zeaxanthin, lutein, choline, and beta-carotene.
Cabbage acts as a powerful detoxifier, purifying the blood and removing toxins, primarily free radicals and uric acid.
It is also a strong anti-inflammatory agent, so consuming it may reduce the effects of various types of inflammation, irritation, allergies, joint pain, fever, and various skin disorders.
Because of its strong antioxidant quality, cabbage is touted to aid in the prevention of various cancers, including breast cancer, prostate cancer, bladder cancer, and colon cancer.
Cabbage supports the digestive tract and is well known for soothing and healing stomach ulcers.
Additional Tips
- Cabbage requires plentiful and consistent moisture. While watering the plants early in the day is advised, you can conserve moisture in the soil by adding mulch.
- The members of the cabbage family – cauliflower, broccoli, Brussels sprouts, kale, and others – are susceptible to similar diseases and pests. Avoid planting them in close proximity.
- You may use a floating row cover to protect the plant from early pests.
- To minimize the chance of diseases in the cabbage, avoid planting cole crops – cauliflower, broccoli, Brussels sprouts, and others – in the same pot each year. Rotate with non-cole crops for 2 years before planting in the same pot.
- If the plant gets infected with purple blotch, avoid wetting the foliage while watering.
- Discourage clubroot disease by increasing the pH level of the soil (up to 7.5 pH). Add lime to the soil to increase its pH level.
- If you’re growing cabbage to harvest seeds, isolation may be required as cabbage crosses readily with its close cousins. So, stick with only one type of cabbage when growing for seeds.

