No matter how pretty those white-tipped acrylic nails look, when they become chipped or start looking tacky, they have to go. Agreed?
Acrylic nails have always been a subject of envy as well as adoration for many. For people with weak and brittle nails, they help them realize their dreams of beautiful and elegant nails.
While the ordinary manicure may start chipping off the next day, acrylic nails usually last much longer. Sadly, the precious acrylics also come with a shelf life. Acrylic nails need to be maintained every 2 to 5 weeks.

When they become unappealing, that’s when you make another trip to your salon to get them removed. But because a visit to the salon is sometimes not in the budget, the seasoned do-it-yourselfers will want to do it at home. The key is not to be tough on your nails.
Here are five different methods to remove acrylic nails easily at home, three of which make use of acetone.
Prepare a comfortable workspace. You can use any table, but arrange a comfortable seat and have your favorite book or magazine handy, as acetone takes quite some time to work.
Contents
- Method 1: Wrapping the Nails in Acetone-Soaked Cotton Pads
- Step 1. Cut cotton pads in half
- Step 2. Soak a pad with acetone
- Step 3. Remove the old nail polish
- Step 4. Buff the surface of your acrylic nails
- Step 5. Apply petroleum jelly
- Step 6. Soak a cotton pad in acetone
- Step 7. Cover your nail with a soaked cotton pad
- Step 8. Cut aluminum foil pieces
- Step 9. Seal it with aluminum foil
- Step 10. Take the foil casing off your nails
- Step 11. Reapply the foil casing if needed
- Step 12. Smooth out your nails with a nail buff
- Step 13. Apply petroleum jelly to moisturize
- Method 2: Soaking the Nails in Acetone
- Method 3: Soaking the Nails in Warm Acetone
- Method 4: Using a Nail File
- Method 5: Using Dental Floss
- Additional Tips
Method 1: Wrapping the Nails in Acetone-Soaked Cotton Pads
Things you’ll need:

- Pure acetone
- Nail polish remover
- Petroleum jelly
- Cotton swabs
- Cotton pads
- Aluminum foil
- Nail buffer
Step 1. Cut cotton pads in half

Cut several cotton pads in half. You can use cotton balls; they tend to absorb more of the acetone it will not evaporate so quickly.
Step 2. Soak a pad with acetone

Soak half a cotton pad with acetone (nail polish remover).
Step 3. Remove the old nail polish

Remove the old nail polish from your nails.
Step 4. Buff the surface of your acrylic nails

Before continuing with the process, slightly file the surface of your acrylic nails with a fine-grit buffer.
Step 5. Apply petroleum jelly

To prevent the acetone from completely drying the skin around your nails, liberally apply petroleum jelly with a cotton swab.
Step 6. Soak a cotton pad in acetone
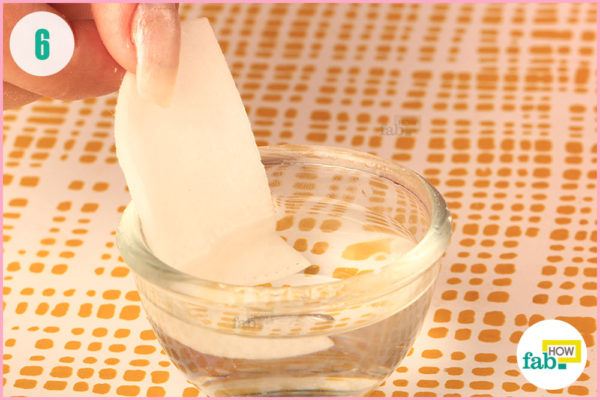
Soak half a cotton pad in pure acetone.
Step 7. Cover your nail with a soaked cotton pad


Fold the cotton pad soaked in acetone completely around your nail.
Step 8. Cut aluminum foil pieces

Cut aluminum foil into pieces that are big enough to encase the front part of your fingers.
Step 9. Seal it with aluminum foil


Secure the acetone-soaked cotton pad to your nail by wrapping a piece of aluminum foil around it. Wrap the tip and the middle segment of your finger with the foil like a toffee.
Your nail needs to stay in there for quite some time. Consider it a job well done when your nail is firmly cocooned in the foil.
Repeat steps 7 through 9 with each nail.
Step 10. Take the foil casing off your nails


Relax while the acetone works on your acrylics. Sneak a peek to assess the progress after about 25 minutes.
Step 11. Reapply the foil casing if needed


Reapply the foil casing for some more time if your acrylic nail hasn’t let go of your natural nail yet. Don’t exceed the time limit of 50 minutes in total.
The time needed for the acetone to take the acrylic nails off your nails may depend on factors like the individual characteristics of your nails and how old your acrylic nails are.
Step 12. Smooth out your nails with a nail buff


Once your natural nails are free of the acrylic nails, you can smooth any rough surfaces by buffing them. Next, shape the nails to your liking.
Step 13. Apply petroleum jelly to moisturize

Clean your hands of any acetone, followed by liberal moisturizing — massage petroleum jelly into your nails and surrounding skin to counter the drying effect of acetone.
Method 2: Soaking the Nails in Acetone
Things you’ll need:

- Pure acetone
- Bowl
- Olive oil
- Cotton swabs
- Cotton pads
- Nail buffer
- Cuticle pusher
Step 1. Apply olive oil on your forefingers

Generously apply olive oil on the skin surrounding your nails. It will protect your fingers against the drying effect of acetone.
Step 2. File the topcoat off of your nails

Gently file the topcoat off your acrylic nails. Removing the topcoat will allow the acetone to be more effective on your acrylic nails.
Step 3. Soak your nails in acetone


Give your nails a thorough soak by dipping your fingers in acetone for about 40 minutes.
You can take your fingers out of the acetone bowl when the fake nails are completely removed. It may take less than 40 minutes.
Step 4. Shape and buff your nails


Buff your nails gently to make them smooth. This will also help remove any residual glue from the acrylic nails.
Shape your nails according to your preference.
Step 5. Moisturize your nails with olive oil


Make up for the loss of moisture in your nails and skin by applying olive oil liberally on the skin around your nails.
Also, massage the oil thoroughly over your nails and cuticles.
Method 3: Soaking the Nails in Warm Acetone
Things you’ll need:

- Warm water
- Pure acetone
- Bowls – 2 (one small enough to fit inside the other)
- Petroleum jelly
- Cotton swabs
- Orange stick
- Nail file
- Nail buffer
Step 1. Apply petroleum jelly on your forefingers

Coat your fingers with petroleum jelly to protect them from the drying effect of acetone. You can use a cotton swab to do it if you don’t wish to slime your hands.
Step 2. Warm acetone in a water bath

This method calls for warm acetone. The ideal way to do it is giving it a warm water bath. Just place a bowl of acetone into a bigger bowl full of warm water.
Heating acetone any other way at home is not advisable. Being highly flammable, acetone should be used with caution.
Step 3. Soak your nails in warm acetone


Soak your fingers in warm acetone for 40 minutes, or less if your fake nails come off your natural nails early.
Old acrylic nails should come off faster, as the glue attaching them to your natural nails weakens with time.
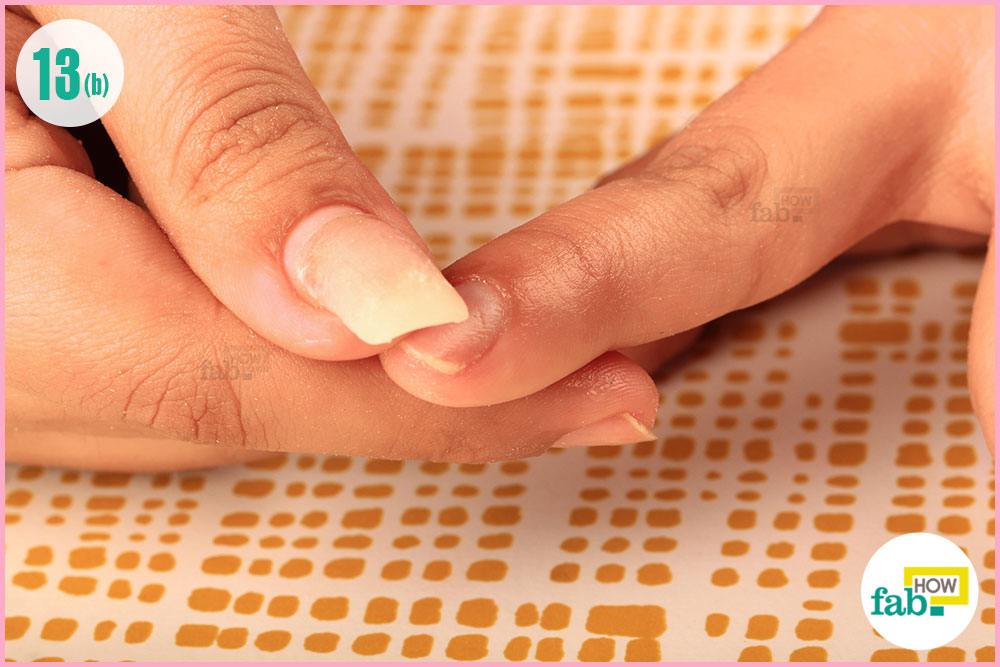
Step 4. Remove remaining acrylic bits gently with an orange stick

If some bits of the acrylic nails haven’t come off, you can use an orange stick to gently push them off your natural nail. Be gentle. Resist the urge to force it off. Instead, give it another try after a bit more soaking time.
Step 5. File off any remaining glue

If there are any remnants of the acrylic or glue still on your nails, you can gently file them off.
Step 6. Buff and shape your nails

Once your natural nails are completely free of the acrylic and glue, buff and shape them to your liking.
Step 7. Moisturize with petroleum jelly


Apply petroleum jelly liberally on your fingers to restore moisture. Massage it into the cuticles, nails, and the skin around your nails.
Method 4: Using a Nail File
This method is comparatively faster, but you should attempt it only if you’re a master of patience. Hurrying this process along may cause severe harm to your nails.
Things you’ll need:

- Nail polish remover
- Olive oil
- Cotton pads
- Nail file
- Nail buffer
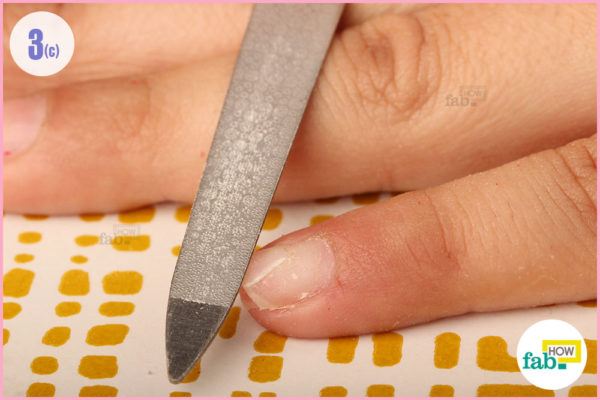
Step 1.Remove the old nail polish

Soak a cotton pad in nail polish remover and gently rub off your old nail polish.
Step 2. Buff the surface of the nails


Using a file of extremely fine-grit, gently file the surface of your nails. It is important to start with a file of fine-grit.
You can also use a nail buffer for this job.
Step 3. File off the acrylic nails


Now using a file of somewhat coarser grit, slowly file away your acrylic nails. You have to be gentle on your nails.
To ensure an even filing over the nails, you can file in a crosshatch pattern (#), all the while filing in one direction.

Keep cleaning off the nail dust so that you can easily see the areas that need to be filed and you won’t accidentally file your natural nail.
Step 4. Moisturize the nails with olive oil


While you’re filing away your acrylic stick-on, your natural nail endures friction, if not damage. Finish up this method by giving your nails a thorough and gentle massage with olive oil. You can use your hands or a cotton swab for this purpose.
Method 5: Using Dental Floss
Using dental floss to remove your acrylic nails is very time efficient. While other methods take between 30 and 50 minutes (more if you include preparation time), this is your go-to method if you can’t afford to spare that much time.
However, this method does require help from a partner. Doing this by yourself is not feasible, as well as risky for your nails.
Things you’ll need:

- Olive oil
- Cotton swabs
- Dental floss
- Nail buffer
Step 1. Slip the floss under the edge of the acrylic nail


Usually, after some time, the acrylic nail starts pulling up at the bottom. Ask your partner to slip the dental floss under the bottom edge.
If the bottom edge has not come up, you can use an orange stick to very gently pry up the edge of the nail.
Step 2. Work the floss back and forth gently


Let your partner work the floss gently between the acrylic nail and the natural nail using aback–and-forth motion.
Make sure that your partner doesn’t pull at your acrylic nail with the floss if you don’t want to be in pain.
Step 3. Floss until the acrylic nail comes off


The floss will gradually move forward, cutting through the glue under the acrylic nail, soon after which your acrylic nail should pop off.
Step 4. Buff and shape your nails


After taking off all your acrylic nails, you need to give proper care to your natural nails. Buff the nails to smooth them out and shape them to your liking.
Step 5. Moisturize with olive oil


Apply olive oil to your nails. Massage it into your nails thoroughly to moisturize and nourish them.
Additional Tips
- Work with acetone in a well-ventilated place so that you don’t inhale the fumes.
- Acetone is highly flammable. Keep it away from any spark or heat source. Therefore, smoking near acetone is a definite no.
- Warm up the acetone only in a water bath. Do not attempt to heat it or put it in an oven directly.
- Acetone should never be stored in a plastic container. Store it in a glass or ceramic container instead.
- You can cut up aluminum foil and cotton pads beforehand to save time.
- Always file your nails in one direction. Resist the urge to use a sawing motion.
- Be super careful while using floss. Sure it’s the fastest method, but hurrying it along might severely damage your nails.
- Give your nails a break as they’ve been through a lot. Use gloves while cleaning for some time to avoid exposure to cleaning chemicals. You can also wait for a week or so before getting a fresh manicure.
- None of the methods should be painful to your nails. If your nails hurt in the process, you should seek a professional’s advice.
