Fabhow.com – Diwali – the festival of lights – is celebrated with much fervor and joy by Hindus all around the world. Apart from decorating houses with colorful lights and diyas, creating elaborate rangolis is an important ritual of this festival.
Rangoli is a form of art in which beautifully colorful and intricate patterns are drawn on the floors inside homes as well as on the pavement outside and filled in using colored rice flour, colored rice, colored sand or real flowers.
Drawing rangolis on the day of Diwali is also a way of seeking blessings from the gods and goddesses. As easy as it may appear to be, rangoli-making is no cakewalk. It involves meticulousness and will put your motor skills to the test drawing clean shapes with dry flour and filling them up precisely with colors.
Whether you are a beginner or a pro, making rangolis certainly requires patience and creativity. However, you need not be disheartened if you want to make a rangoli but lack an artistic flair. There are a number of hacks you can use to make lovely, symmetrical rangolis with minimal effort. In fact, you can also check out our DIY decoration ideas to brighten up your homes this Diwali.
We bring to you some really cool ideas for making rangolis using homemade colors, DIY stencils for that extra helping hand, and some nonconventional types of rangolis.
Read on to learn DIY easy hacks to make stunning rangoli designs this Diwali.
Method 1: DIY Rangoli Color
Traditional rangoli designs are made with rice flour or rice grains that are colored at home using either organic products like turmeric powder, vermillion and others, or food coloring – an easier option, of course. They are then used to make stunning rangoli designs on the floor in the house or the pavement outdoors.
We used powdered food coloring on rice flour, and liquid colors on rice grains, which need to be dried first.
# Using Rice Flour
Things you’ll need:

- Rice flour
- Powdered food coloring of your choice
Single-Step Method: Mix food coloring powder in the rice four

- Start with 2 tablespoons of rice flour in different containers for each color you want to make. You can increase the quantity of flour according to your needs.
- Sprinkle about 1 tablespoon of food coloring powder into 2 tablespoons of rice flour. Since there is no science behind it, you can increase the quantity of the coloring powder until you get the desired hue and intensity.
- Repeat the same process using the other colors to get instant rangoli colors.

# Using Rice
Things you’ll need:

- Rice
- Liquid food coloring in a spray bottle
Single-Step Method: Spray food coloring on the rice grains and let it dry

- Put some rice in a big bowl.
- Spray the liquid food coloring into the bowl. Continue to stir the rice as you spray it to spread the color evenly.
- Once you are satisfied with the shade of the color, spread the rice over a newspaper and allow it to air-dry completely.
- Make several batches using different colors.
- Collect the colored rice in bowls and get set to create colorful rangolis.

Method 2: DIY Rangoli Stencils
If you find yourself artistically challenged but aspire to make a fine piece of art, worry no more. We are here to help you with simple ways to make stunning rangoli designs using DIY stencils. These stencils can be made using paper, disposable paper plates or mosquito-repellant coils. Never thought of the last one? Scroll further to see how it’s done.
# Paper
Things you’ll need:

- Thick paper (A3 size)
- Scissors
- Pencil
Step 1. Fold the paper in half twice

- Begin with folding the paper in half crosswise.
- Fold the paper in half again, as shown in the image above.
Step 2. Draw the design and cut it out to create the stencil

- Then, fold it diagonally.
- Press down the folds to get sharp edges.
- Draw the shape near the edge where all the folds meet, as shown in the image above. There are plenty of shapes available online. If you are a beginner, choose one that is easy to follow, such as the one above.
- Using scissors, cut along the drawn lines to create the stencil.

- Once done, open the folds to reveal your stunning stencil.
Step 3. Secure the stencil on the floor and fill the cut outs with colors

- Use small pieces of double-sided tape to secure the stencil to the floor.
- Begin filling the cut out areas with the colors of your choice. You can either make your own colors as described in Method 1, or get ready-made ones from the market.
- Once you’ve filled up all the cut outs, slowly peel the stencil off the floor.

# Disposable Paper Plate
Things you’ll need:

- Disposable paper plate
- Permanent marker
- Ruler
- Toothpicks
Step 1. Draw the pattern on the plate

- Use the ruler and permanent marker to draw the floral pattern on the plate, as shown in the image above.
Step 2. Perforate the drawn shape

- Use a toothpick to poke holes along the drawn lines. Your DIY stencil is ready to be used.
Step 3. Sprinkle rice flour over the perforated plate

- Place the plate inverted on the floor.
- Sprinkle plain or colored rice flour over the holes of the stencil.
- Carefully lift the stencil off the floor.
- Place a diya in the middle of the rangoli to add decoration.

# Coils
Things you’ll need:

- Rangoli colors
- Mosquito-repellant coils
Single-Step Method: Sprinkle colors over coils to create spiral designs

- Place the coils, which serve as stencils, on the floor according to the pattern you wish to create.
- Sprinkle the rangoli colors between the gaps in each coil, as shown in the image above. Use different colors for every other coil.
- Once done, gently lift up all the coil stencils.
- Decorate your spiral rangolis by placing a diya in the middle.

Method 3: DIY Rangoli Design
It’s time to don your creative hat. Use vibrant rangoli colors to create some awe-inspiring yet easy-to-make rangolis described in this section. If you find making your own rangoli colors cumbersome, you can simply get ready-made colored sawdust or sand from the market.
Also, apart from the basic colored rice flour and grains, you can make stunning rangoli designs with fresh flowers. Bright flowers add more real colors to your rangolis and also leave your room smelling great.
If you wish to take it a step further, we’ll also show you how to use colored rhinestones and pearls to create a more permanent rangoli. Excited? Check out the detailed steps below.
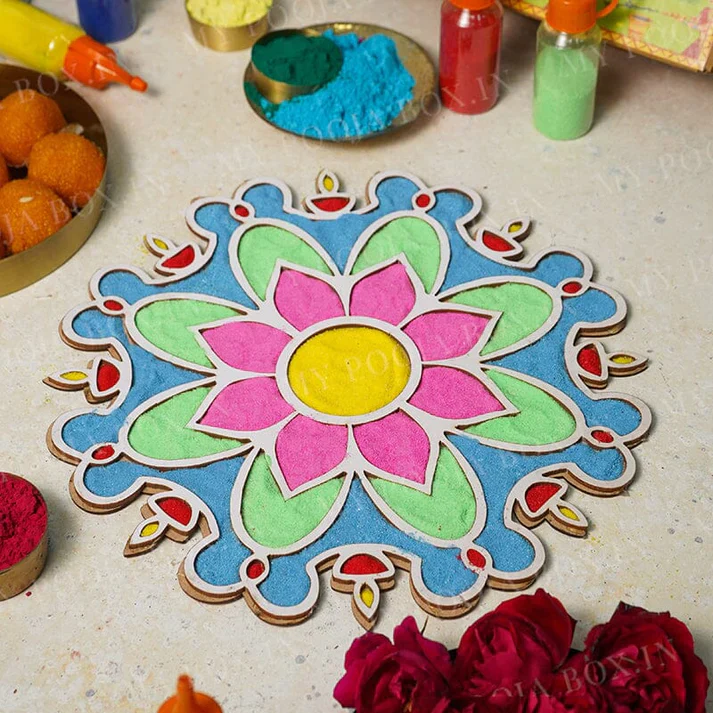
# Using Colored Rice
Things you’ll need:

- Multi-colored rice
- Sketch pens
Step 1. Draw a design on the floor and fill the center with colored rice

- Using a sketch pen, draw the outline of the design on the floor.
- Now, you’ll fill up the shapes with various colors of rice. Make sure you stay within the lines when filling up the shapes. If you find it difficult to precisely sprinkle the rice with your hands, you can use a paper cone as a funnel to neatly fill up the shape.
- Begin at the center and fill up the innermost circle with yellow rice.

- Fill the next circle with red rice, followed by green rice for the third circle.

- Start filling up the outer portion of the petals with yellow rice.
- Fill the middle of each big petal with green rice, as shown in the image above.
- Create a wide outline around all the petals using red rice.

- Finish the rangoli by giving the design a thin yellow outline.
- Finally, add blue dots between the petals to add more color.

# Using Fresh Flowers
Things you’ll need:

- Marigold flower petals – 2 colors
- Rose petals
- Tuberose flowers
Step 1. Create a colorful round rangoli with layers of different flower petals

- Start by making a small circle with rose petals.
- Encircle the rose petals with a thick layer of dark-colored marigold petals.

- Create a third layer by placing rose and marigold petals alternately in the same line. See the image above for reference.
- Add another thick layer of dark marigold petals.

- Continue to extend the design to the desired size by adding more circles of rose and marigold petals, respectively.
- Finish up the design by placing tuberose flowers over the outermost layer.
- You can use your creative liberty here to use more of the white flowers to create contrast.
- Place a diya in the center of the flower rangoli to brighten it up.

# Using Rhinestones and Pearls
Things you’ll need:

- Rhinestones (round and drop-shaped in 2 colors)
- Pearl strings (3 types, varying in pearl size)
- Pencil
- Glue
- White sheet of paper (A1 size)
Step 1. Draw the rangoli outline on a large white sheet of paper

- Draw a circle in the center of the sheet. You can use any circular container and trace around it.
- Draw a smaller circle inside the first circle.
- Make drop-shaped petals around the circle to create a floral pattern.
Step 2. Glue the rhinestones and pearl strings on the drawn outline

- Apply glue on the back of each drop-shaped stone and place it around the innermost circle. Continue adding stones until you’ve covered the circumference.
- Outline the stones with a golden pearl string. Refer to the image above.

- Glue on a layer of round-shaped stones alongside the gold pearls.
- Glue drop-shaped stones on each of the petals, as shown in the image above.
- Leave the tip of each petal open. It will be filled in later using round stones.

- Apply glue along the inner line of the petals.
- Stick the thinnest pearl string on the glue line.
- Repeat the same for every petal.

- Using glue, stick small floral patterns of stones in the middle of each petal.

- Close the tip of each petal by placing a round stone, followed by a drop-shaped stone with its tip pointing outward.
- Finish up the rangoli by gluing a pearl string along the outer lining of the middle circle.
- Allow the glue to dry completely.
- Decorate the kundan rangoli by placing a tealight in the center.

# Using Colored Sawdust
Things you’ll need:

- Ready-made colored sawdust
Single-Step Method: Draw a rangoli outline and fill it up with different colors

- Select the design you wish to make and draw its outline on the floor. You can use sketch pens or chalk to draw the outline.
- Fill up the circles and petals in the design using colors of your choice.

Tips
- When making rangoli colors, remember to wear gloves to avoid staining your hands.
- To make a rangoli, draw a rough outline first on the floor. Once you are sure of the shape, refine the outlines and then begin filling it with colors.
- When making colored rice flour, add about 2 tablespoons of table salt to the rice flour to get a grainy texture.