You would have to be living under a proverbial rock if you do not know of the existence of Facebook. So, if you do not have a Facebook account already, it is probable that you may feel the need to experience the rage behind the social network.
Making a Facebook account is a pretty simple procedure, given the minimalistic approach of Facebook. Even if you are a first-time user, you will hardly break a sweat because the process is quite easy.
For an existing user, making a new account is an opportunity to wash away the sins of the past and start over with a new beginning, but do not forget to delete your previous account first.
Contents
Steps to Create a Facebook Account
Step 1. Go to the log-in page

Go to Facebook’s log-in page by typing the URL www.facebook.com in your browser’s address bar. You will see "Create an account" written in big bold letters, below which are some formalities like name, email/phone number, password, gender and date of birth.
Step 2. Fill in the sign-up form

Fill the sign-up form with correct information. Start with your name, followed by entering your email address or mobile number.
Create a secure password. Make it a bit lengthy, like a phrase, including special characters. For example,"humorsetting@60%".
Enter the details of your birthday, select your gender and finally click on the "Create an account" button.
Step 3. Find your friends

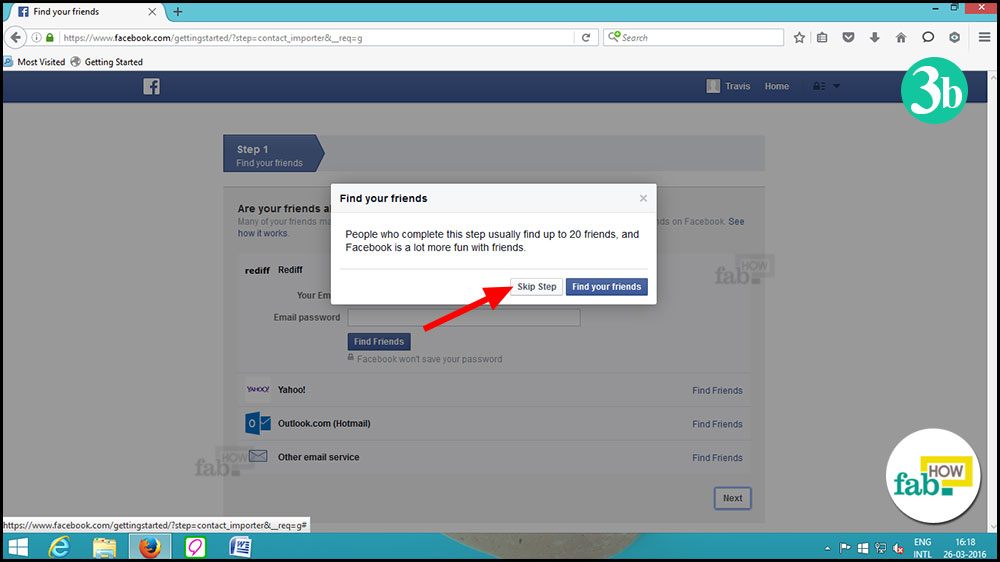
If you entered an email address in the sign-up form, Facebook will prompt you on the next page to search for your email contacts in Facebook and add them as friends.
If you prefer not to search this way, you can click "Next" and then click on "Skip Step" in the pop-up window.
If you choose to search for friends this way, you'll have to enter your email address and password to allow Facebook to access your email contacts.
When entered mobile number in the sign-up form


If you entered your mobile number instead of email in the sign-up form, Facebook will send a confirmation code to your mobile to verify that the phone number is correct. Enter the code into the field above the blue bar and press "Confirm". Your account will be confirmed.
Step 4. Facebook account is set up
Your Facebook account is now set up and your home page will open.
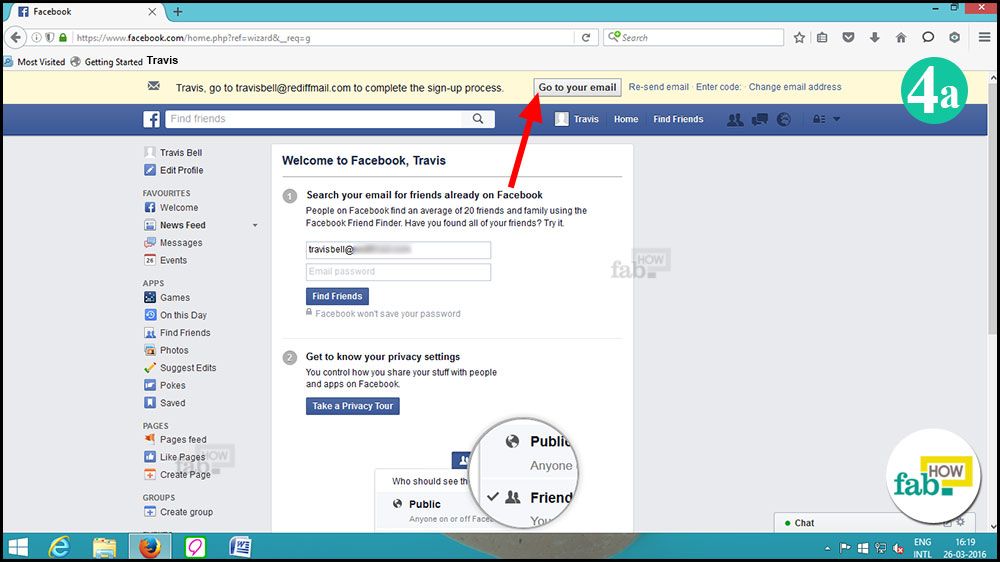

You will see a pop-up window asking you to confirm your email address (if you have used an email address in the signup form). Click on the “Go to your email” button and you will be redirected to your email. To complete the sign-up process, click on the "Confirm Your Account" button.

A dialog box will open stating that your account was confirmed. Click on “OK”.
This step is of no use to those who filled their mobile number in the signup form, unless you wish to add your email address to Facebook too.
Step 5. Upload profile picture
In the next step, you must upload a profile picture for your account. It doesn’t have to be a picture of you. It can be a picture of anything, but try to use something that represents one of your personal interests or a photo that you like a lot. Your profile picture will display by your name in your friends’ lists of friends and alongside every comment you make throughout Facebook.


Click on your name beside the Home option in the blue bar to go to your profile page. In your profile, you’ll see a silhouette of a person’s head. Click on the “Add Photo” icon at the bottom of the silhouette.


An “Add Profile Picture” window will open and provide you with two choices–to upload a photo or to take one.
If you have a webcam attached to your PC or laptop, you can click on "Take Photo." If you don't want to do that, you can click on "Upload Photo". A “File Upload” window will open. Browse and select a picture from your computer, then click the “Open” button.

Now, crop and zoom the photo according to what you want the other Facebook users to see. Click on “Crop and Save” to finally submit the profile picture.
Step 6. Upload cover picture
Once you have uploaded your profile picture, you can upload a cover picture for your profile page. The cover photo usually reminds you of something that you hold dear or which connects to your heart. Of course, you can put anything you like on your cover.


On your profile page, click on the “Add Cover Photo” button and select “Upload Photo” from the drop-down menu.

A “File Upload” window will open. Browse and select the picture you wish to upload and click on “Open”.


Once the cover picture is uploaded, you can click on the picture, hold down your mouse button and drag it up or down until you are happy with the portion of the picture displaying in the cover photo area. Then, click the “Save Changes” button.
Step 7. Start finding friends
Having a Facebook account is pointless if you are a lone wolf. You need to create a social circle to interact with others on Facebook. To do that, you can use Facebook's help to find friends or tinker manually in the “Find people you know” section.


On your profile page, click on the “Friends” tab. Then, click on the “Find Friends” button to search for friends by connecting with your email contact list.

In the Friends tab, there is an option for customized searching that lets you search for other Facebook users by Name, Home Town, Current Location, High School, College/University or Company where they work.
For each friend you find, you’ll need to send a “Friend” request and wait for the other person to accept or reject the request. When they accept the request, you’ll each be added to your respective Friends lists.
If they reject your request or do not reply, either way, do not automatically take it personally. They may not be very active on Facebook, or they may be someone who has the same name as your friend but is not actually the person you know.
As you develop your social circle on Facebook, you’ll start to see your friends’ posts and create your own to enjoy all the benefits (and occasional downsides) of Facebook.
Additional Tips
- Adding your mobile number makes your Facebook account more secure.
- Remember that you can use your mobile number to verify only one account.
- Remember, creating multiple personal accounts is against Facebook’s Community Standards.
- Facebook does allow individuals to create a separate page for your business or product.
- If you are an existing Facebook user and desire a clean slate, you must first permanently delete your current Facebook account.