Many consider honey to be the ‘Nectar of the Gods’ and rightly so, it has been an elixir of health and beauty since ancient times.
While we won’t go into all of the health benefits of honey right now, we will focus on its beauty benefits, which are also plentiful.
The goodness of honey is endless, while it has many nutrients, antioxidants, and other health-promoting properties that is exactly what makes it so extremely suitable for skin and hair care as well.

It is a natural humectant, which means it readily attracts moisture and helps keep your skin and hair hydrated. It is an anti-inflammatory, extremely soothing, and its mild antibacterial properties provide gentle protection for the skin and scalp.
The antioxidants also help maintain overall skin health by nourishing and protecting it from damage by free-radical.
If you’ve ever dealt with honey, you know it is a sweet, sticky, viscous mess. But honey-based recipes with added natural ingredients make it easier to handle and spread it around.
We have rounded up some easy DIY honey recipes to help you use it for gorgeous hair and skin. These remedies will help you deal with a lot of issues – like banishing dandruff, acne, soothing sunburned skin, or just making your hair soft as silk and getting baby-soft skin.
Contents
- Uses of Honey for Gorgeous Hair
- Uses of Honey for Glowing Skin
- Additional Tips
Uses of Honey for Gorgeous Hair
A honey-based hair care regime is the perfect way to undo the damage from all the coloring and styling of your hair as well as preventing undue hair loss.
Honey shampoo and conditioner can help you through the regular detoxing process, while the hair mask will give your hair that extra gloss that you desire.
Method 1: Hair Mask
This hair mask softens and conditions your hair and is perfect for reviving dull and dry hair.
Honey acts as a humectant and helps keep the hair shafts hydrated, while apple cider vinegar removes product buildup in the hair.
Coconut oil will provide additional nourishment and moisture to your hair.
Things you’ll need:
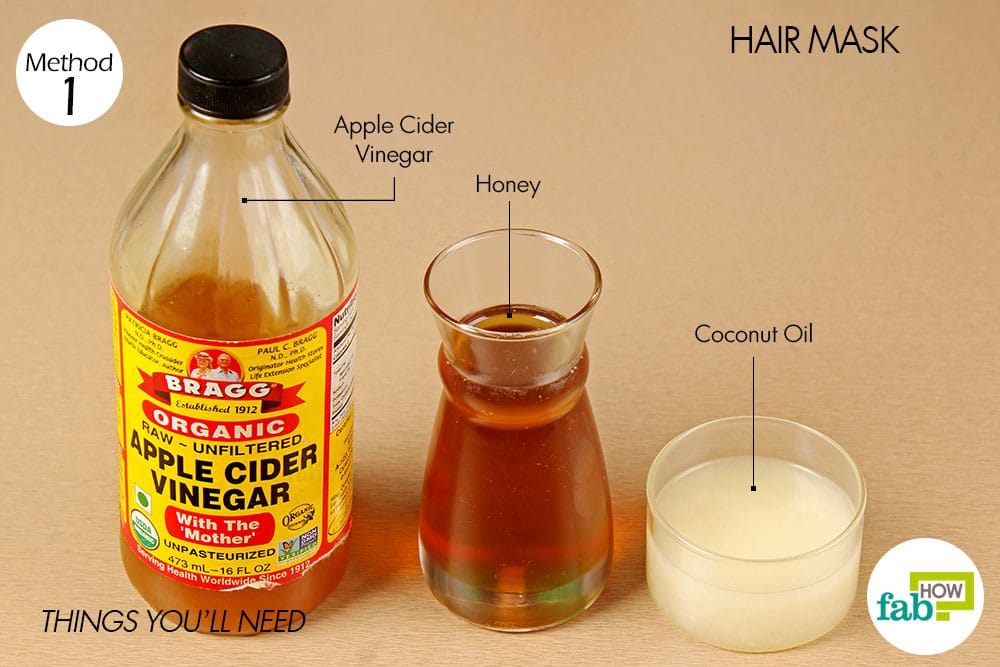
- Raw, unfiltered apple cider vinegar (cleanses and conditions) – 1 tablespoon
- Honey (acts as humectant) – 1 cup
- Coconut oil (moisturizes and nourishes) – ¼ cup
Step 1. Combine the ingredients in a jar

- Pour 1 cup of honey into a jar.
- Add 1 tablespoon of raw, unfiltered apple cider vinegar.
- Add ¼ cup of coconut oil.
Step 2. Mix well and use once or twice a month

- Mix the ingredients well using a stick mixer or hand blender.
- Work the hair mask into damp hair as you normally would use a shampoo.
- Let it set in for 20 to 30 minutes before rinsing it out with warm water.
- Using this hair mask once or twice a month regularly will provide great results.
- Stored in an airtight jar in a cool and dry place, the mask should keep well for 1 month.
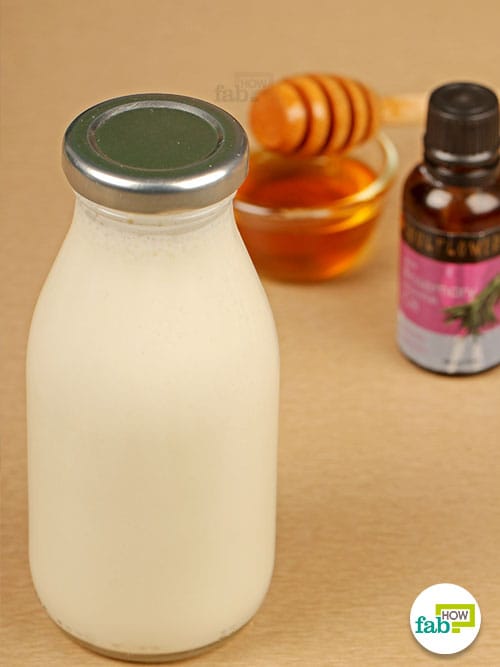
Method 2: Shampoo
This honey-based shampoo is extremely gentle yet effective. If your hair isn’t responding well to commercial shampoos, try this DIY honey shampoo for a complete hair detox to get a lush, long mane.
Coconut milk, which serves as the base of the shampoo, nourishes the hair and will help keep dandruff at bay. Honey will keep your hair soft and moisturized through the day.
Apple cider vinegar removes dirt, grease, and product buildup from the hair. Castor oil, vitamin E oil, and rosemary oil provide extra nourishment and also help keep the scalp healthy.
Things you’ll need:

- Coconut milk (provides nourishment, removes dandruff) – 1½ cups
- Honey (acts as humectant) – 2 tablespoons
- Raw, unfiltered apple cider vinegar (cleanses and conditions) – 2 tablespoons
- Castor oil (provides nourishment, helps prevent scalp problems) – ½ teaspoon
- Vitamin E oil (provides nourishment, helps prevent scalp problems) – ½ teaspoon
- Rosemary essential oil (provides nourishment, helps prevent scalp problems) – 5 or 6 drops
Step 1. Combine the ingredients

- Pour 1½ cups of coconut milk into a jar or pitcher.
- Add 2 tablespoons each of honey and apple cider vinegar to it.
- Add ½ teaspoon each of castor oil and vitamin E oil as well.
Step 2. Add essential oil, mix well and use twice a week

- Add 5 or 6 drops of rosemary essential oil and stir well to mix the ingredients together.
- Pour the mixture into an airtight container for storage.
- Use it twice a week as you would your normal shampoo. Simply work the DIY shampoo into your wet hair and rinse it out thoroughly with warm water.
- The coconut milk in this remedy renders it perishable, so your DIY shampoo will only keep well for about 4 to 5 days when stored in a cool, dry place. Make this only in small batches so that you can use up in 2 applications.
Method 3: Conditioner
If your current conditioner is not doing a good job of keeping your hair hydrated or if you’re dealing with frizzy hair, use this honey-based conditioner on your parched hair.
Honey makes for a really great detoxing hair conditioner, and coconut oil provides additional nourishment. Yogurt will nourish the hair and keep scalp problems at bay.
Things you’ll need:

- Honey (acts as humectant and conditioner) – ½ cup
- Yogurt (provides nourishment, helps prevent scalp problems)– ½ cup
- Coconut oil (moisturizes) – 1 tablespoon
Step 1. Combine the ingredients in a jar

- Pour ½ cup of honey into a jar.
- Add ½ cup of yogurt to it.
- Add 1 tablespoon of coconut oil.
Step 2. Mix well and use it to condition your hair twice a week

- Use a stick or small hand mixer, or even a blender to mix the ingredients well.
- Store the DIY conditioner in an airtight jar. When kept in a cool and dry place, it should keep well for about 1 month.
- Apply the required amount into your clean, wet hair, let it sit for 10 to 15 minutes and rinse it out thoroughly with warm water.
- You can use this DIY honey conditioner twice a week.
Uses of Honey for Glowing Skin
Not only does honey act as a gentle humectant for the skin, its mild antibacterial and healing properties also make it useful for a variety of topical treatments – from simple exfoliation to treating acne.
Method 1: Face and Body Scrub
Exfoliation is an integral part of skincare and has made sugar scrubs quite popular. Simple sugar and coconut oil scrub that contains orange essential oil for its fragrance and antimicrobial properties work quite well.
Of course, exfoliation is best when complemented with proper hydration and moisturizing for balanced skincare treatment. Honey-based body scrubs provide nourishment and boost moisturizing effects in the process.
Things you’ll need:

- Honey (acts as humectant) – ¼ cup
- Caster sugar (exfoliating agent) – ½ cup
- Coconut oil (nourishes and moisturizes) – 2 tablespoons
- Orange essential oil (adds fragrance, antimicrobial agent) – 5 or 6 drops
Step 1. Combine sugar and honey with the oils

- Put ½ cup of caster sugar into a small bowl.
- Pour ¼ cup of honey.
- Add 2 tablespoons of coconut oil.
- Add 5 or 6 drops of orange essential oil.
Step 2. Mix well, store and use the scrub for weekly exfoliation

- Mix the ingredients well with a spoon.
- Spoon the scrub into an airtight jar and store it in a cool and dry place for long shelf life.
- Use this scrub for weekly exfoliation to maintain soft and healthy skin.

Method 2: Lip-Healing Agent
Honey is a natural humectant that is suitable for use on the delicate skin of the lips, and it can be very useful for healing chapped lips.
A hydrating honey scrub gently sloughs off the dead skin, while moisturizing the underlying new skin and promoting healing. Follow this remedy with a nourishing lip balm for improved results.
Things you’ll need:

- Brown sugar (exfoliating agent) – 2 teaspoons
- Honey (acts as humectant, healing agent) – 1 teaspoon
- Olive oil (provides nourishment) – 1 teaspoon
Step 1. Combine the ingredients

- Put 2 teaspoons of brown sugar into a small bowl.
- Add 1 teaspoon each of honey and olive oil.
- Mix the ingredients well to make a paste.
Step 2. Use the nourishing honey scrub daily to heal chapped lips

- Apply some of the paste on your lips.
- Massage it over the lips using gentle pressure for about 1 to 2 minutes.
- Resist the urge to lick the sweet scrub off your lips, as saliva will contribute to chapped lips. Rinse off with warm water until clean, and dab off with a damp towel instead.
- Use this scrub once a day regularly for 1 week. Your lips should improve significantly after the first or second application.
Method 3: Face Mask
If you need to look special for an event or just want to pamper yourself, this DIY honey face mask is just right for you. Made with three simple and nourishing ingredients, this face mask is fairly simple to whip up and is especially beneficial for dry skin.
Use virgin coconut oil for best results. For the aloe vera, you can use either store-bought gel or extract fresh gel from aloe vera leaves yourself.
Things you’ll need:

- Honey (acts as humectant) – 1 cup
- Virgin coconut oil (moisturizes) – 1 tablespoon
- Aloe vera gel (provides nourishment) – 1 tablespoon
Step 1. Combine the ingredients in a jar

- Pour 1 cup of honey into a jar.
- Add 1 tablespoon each of virgin coconut oil and aloe vera gel.
Step 2. Mix well, store & use the face mask twice a week

- Blend the ingredients together with a stick mixer.
- Apply the face mask, let it sit for about 15 minutes and rinse it off with lukewarm water.
- Store the DIY face mask in an airtight jar in a cool and dry place.
- Apply this DIY honey facemask twice a week. Unless your skin is oily, then you should only apply it once a week.
- If you’re using fresh aloe vera gel, make a small batch that you can use up within 1 week. If you’re using packaged aloe vera gel, the shelf life of this mask may be extended to a few months possibly.
Method 4: Acne Treatment
If you’re dealing with persistent acne and breakouts, a honey and cinnamon paste can be used as an effective remedy.
Both honey and cinnamon have anti-inflammatory and antibacterial properties. Although some high-quality raw honey may heal acne on its own, adding cinnamon can increase the potency of this remedy.
Things you’ll need:

- Honey (anti-inflammatory and antibacterial properties)
- Cinnamon powder (anti-inflammatory and antibacterial properties)
- Cotton swabs
Step 1. Make a paste of honey and cinnamon

- Put 1 part cinnamon powder and 2 parts honey in a small bowl.
- Mix the ingredients well to make a paste.
Step 2. Apply the paste daily to cure acne

- Wash your face with water and pat dry.
- Use sterile cotton swabs to apply the honey-cinnamon paste as a spot treatment for acne. If the acne covers large areas on your face, you can also use this paste as a mask.
- Let the paste sit for 10 to 15 minutes, then rinse it off with lukewarm water.
- Repeat once a day for 1 week to help clear up the acne on your face.
Method 5: Face Wash
Give this honey-based foaming face wash a try. Its gentle formula is suitable for most skin types and can help you tackle recurrent skin problems.
Castile soap is extremely gentle, but also an efficient cleaning agent. Honey and almond oil will keep your skin from drying out.
Essential oil provides nourishment as well as fragrance. If your skin is extremely oily, you can skip the almond oil in this remedy.
Things you’ll need:

- Honey (acts as humectant) – 2 tablespoons
- Liquid Castile soap (gentle cleaning agent) – 2 tablespoons
- Almond oil (provides nourishment) – ½ teaspoon
- Distilled water (diluting medium) – 1 tablespoon
- Lavender essential oil (imparts fragrance, antimicrobial agent) – 4 or 5 drops
Step 1. Put the ingredients in a jar

- Pour 2 tablespoons each of honey and liquid Castile soap into a bowl or small jar.
- Add ½ teaspoon of almond oil to it.

- Pour 1 tablespoon of distilled water into it.
- Add 4 or 5 drops of lavender or your choice of essential oil.
Step 2. Mix well, store in a pump bottle and use as a face wash regularly

- Mix the ingredients well with a spoon.
- Pour the DIY honey face wash into a sterile pump bottle for convenient use.
- Use as you would your regular face wash.
- If the processing and storing is clean and sterile, this DIY honey face wash can easily last for up to 6 months. Make small batches that you can use up within that amount of time.

Method 6: Bath Soak
Bath soaks don’t just help you relax after a long day. They also help nourish your skin, alleviate sore muscles, and even lull you to sleep.
This honey bath soak is extremely soothing and can help with heat rashes and other skin conditions. Oatmeal adds exfoliating properties to the soak. Epsom salt adds additional soothing properties.
Things you’ll need:

- Honey (acts as a humectant, soothes the skin) – ¼ cup
- Oatmeal, powdered (exfoliating agent, soothes the skin) – 1 cup
- Epsom salt (soothing and relaxing) – 2 tablespoons
Step 1. Combine honey, oatmeal and Epsom salt

- Put 1 cup of powdered oatmeal into a bowl.
- Add 2 tablespoons of Epsom salt to it.
- Pour in ¼ cup of honey.
Step 2. Mix thoroughly, store and use as desired

- Stir the ingredients to mix them thoroughly.
- Spoon the contents into an airtight container and use as needed. Honey and Epsom salt will help prolong the shelf life of this bath soak, but you should consider making fresh batches when required.
- Mix the whole batch into a bathtub filled with water and enjoy your soak.

Method 7: Cuticle Moisturizer
Neglecting your cuticles can result in torn cuticles and hangnails. Regular care and maintenance are crucial to keeping the cuticles healthy.
If your cuticles are dry and damaged, this honey-based cuticle moisturizer can work wonders.
Milk and olive oil provide additional nourishment to the skin, and nail bed while the milk and lemon juice act as toners. This formula will help nourish and beautify the cuticles.
Things you’ll need:

- Honey (acts as humectant) – ½ cup
- Milk (provides nourishment and acts as a toner) – ¼ cup
- Olive oil (provides nourishment) – 1 tablespoon
- Lemon juice (acts as a toner) – 1 tablespoon
Step 1. Mix milk and olive oil

- Pour ¼ cup of milk into a bowl.
- Add 1 tablespoon of olive oil to it.
- Blend the ingredients together with a stick mixer.
Step 2. Add honey and lemon juice

- Pour ½ cup of honey into the mixture.
- Add 1 tablespoon of lemon juice as well.
Step 3. Mix well, store in a jar and use it once a day

- Mix the ingredients thoroughly with a stick mixer.
- Pour the moisturizer into an airtight container and store it in the refrigerator.
- Massage your cuticles with the DIY cuticle moisturizer daily before going to bed. Whip up small batches that you can use up within 1 week, as the milk and lemon juice make this remedy perishable.

Method 8: Sunburn Treatment
The healing properties of raw honey are effective in treating sunburns. So if your beach day has you looking as red as a lobster, this honey recipe will soothe your sunburned skin and promote healing immensely.
Milk and lemon juice will act as a toner and help remove the tan on the sunburned skin.
Things you’ll need:
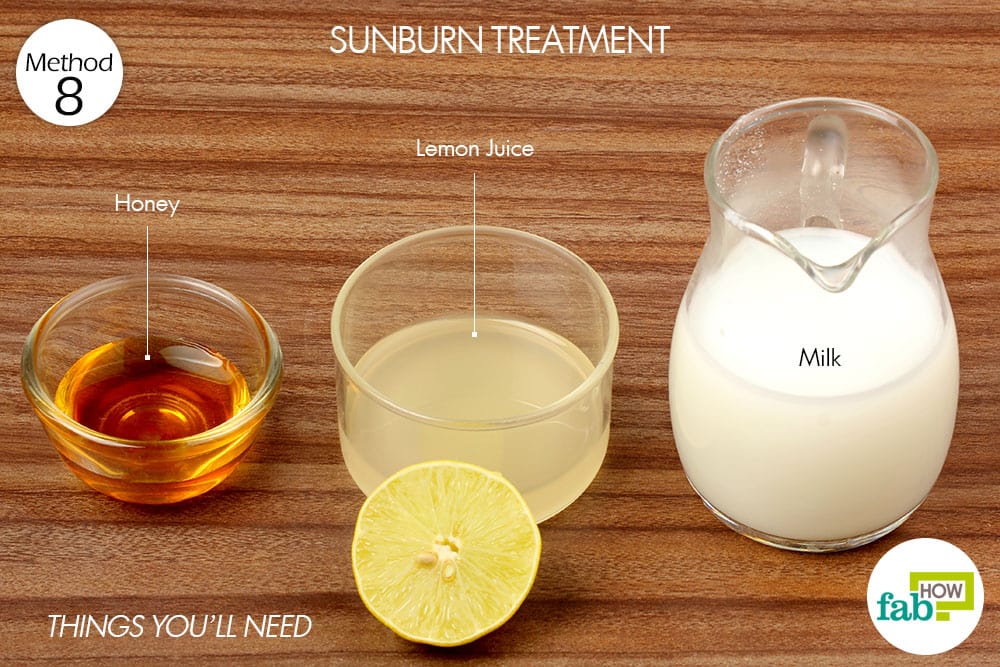
- Honey (soothes skin, acts as a healing agent) – 1 tablespoon
- Lemon juice (removes suntan) – 1 tablespoon
- Milk (soothes skin, acts as a toner) – ½ cup
Step 1: Mix honey and milk

- Pour ½ cup of milk into a bowl.
- Add 1 tablespoon of honey.
Step 2: Add lemon juice and apply the mix on sunburned skin

- Add 1 tablespoon fresh lemon juice.
- Mix the ingredients thoroughly and apply on the sunburned skin to feel immediate relief.
- Let it sit for 15 to 20 minutes, then rinse it off gently with cool water.
- Repeat 2 or 3 times a day until the skin heals completely.
- For best results, prepare fresh batches of the mixture in quantity required for one day’s use.
Method 9: Hair-Removal Agent
If you need a cool DIY alternative for removing unwanted hair at home, this is how you can use honey to make a hair-removal wax substitute.
Combining honey with sugar and lemon juice makes for a natural recipe that is time tested and skin-friendly. It removes hair as well as exfoliates the skin. Honey can help keep the skin hydrated and promotes healing.
You can use it as you would use a normal hair removal wax and clean up afterward is fairly easy. You can also use old cotton cloth to make reusable wax strips. Since the ‘wax’ is basically sugar and honey, the strips can be easily cleaned in hot water.
Things you’ll need:

- Sugar (exfoliates skin, traps hair for effective removal) – 3 tablespoons
- Honey (acts as a humectant, traps hair for effective removal) – 1 tablespoon
- Lemon juice (tones the skin) – 1 teaspoon
Step 1. Mix sugar and honey

- Put 3 tablespoons of sugar into a microwave-safe bowl.
- Top the sugar with 1 tablespoon of honey.
Step 2. Microwave the mixture for 1 to 2 minutes

- Pop the bowl into the microwave.
- Cook on high for 1 to 2 minutes in short bursts of 20 to 30 seconds. Microwave ovens vary in power. Checking periodically will prevent the mixture from burning.
Step 3. Mix in lemon juice & adjust the thickness of the ‘wax.’

- Add 1 teaspoon of lemon juice to the mixture stirring in a little at a time.
- Stir well to blend in the lemon juice completely.
- With melted sugar and honey, the texture of the ‘wax’ should be like that of honey.
- If the mixture is too thick, add a little bit of honey along with a couple of drops of lemon juice to thin it out. If the mixture is too thin, you can add more sugar and microwave again.
Step 4. Let the mixture cool, then use as you would a regular wax

- Let the mixture cool for about 20 minutes, spread over a flat dish.
- After 20 minutes, test the temperature of the honey ‘wax.’ Use it while it is still comfortably warm.
- Use a clean spatula or Popsicle stick to apply it over the area with unwanted hair. Spread it on your skin in the same direction hair grows.
- Cover the wax with a waxing strip. Rub it in the direction of the hair to let it bond with the wax.
- Grab the end of the waxing strip and rip it off in one swift motion only in the direction of the hair growth.
- Repeat the process as needed. While it is painful, the pain is comparatively less than when using generic wax.
- The leftover wax can be stored in an airtight glass jar in the refrigerator for a few months. Just reheat it in the microwave and use as needed.

Additional Tips
- You can also add honey to your regular shampoo and conditioner to get better hair care from your favorite products.
- You can add Castile soap to your DIY honey shampoo to make the formula foam.
- White sugar can be used as a substitute for brown sugar in the recipes.
- When making the honey hair-removal wax, you can also add lemon juice before microwaving the ingredients.
- You can also melt the coconut oil before using it in the recipes.
Summary of How to Use Honey for Skin and Hair

Download this infographic.