Upcycling plastic bottles not only satisfies your creative urge but also contributes to environmentally friendly, green practices.
Their durability and availability in different shapes and sizes makes plastic bottles reusable in many artful ways. So, the next time you’re left with an empty soda bottle, don’t just throw it away. Use it to make something pretty awesome.
Here are 15 cool ways to reuse old plastic bottles.

Contents
- Method 1: DIY Fresh Saver
- Method 2: Tapered Candlesticks
- Method 3: Utility Holder
- Method 4: Multi-purpose Zippered Container
- Method 5: Egg Separator
- Method 6: Bottle Cap Container for Small Items
- Method 7: Bird Feeder
- Method 8: Mobile Charging Basket
- Method 9: Water Sprinkler
- Method 10: Squeeze Bottle
- Method 11: Jewelry Stand
- Method 12: Piggy Bank
- Method 13: Planters
- Method 14: Gift Boxes
- Method 15: Stink Bug Trap
Method 1: DIY Fresh Saver
One of the coolest plastic bottle hacks is to use the top of an old water bottle to make an airtight seal on a plastic bag for storing perishable items in your kitchen.
Things you’ll need:

- Plastic bottle
- Marker
- A pair of scissors
Step 1. Cut off the bottleneck
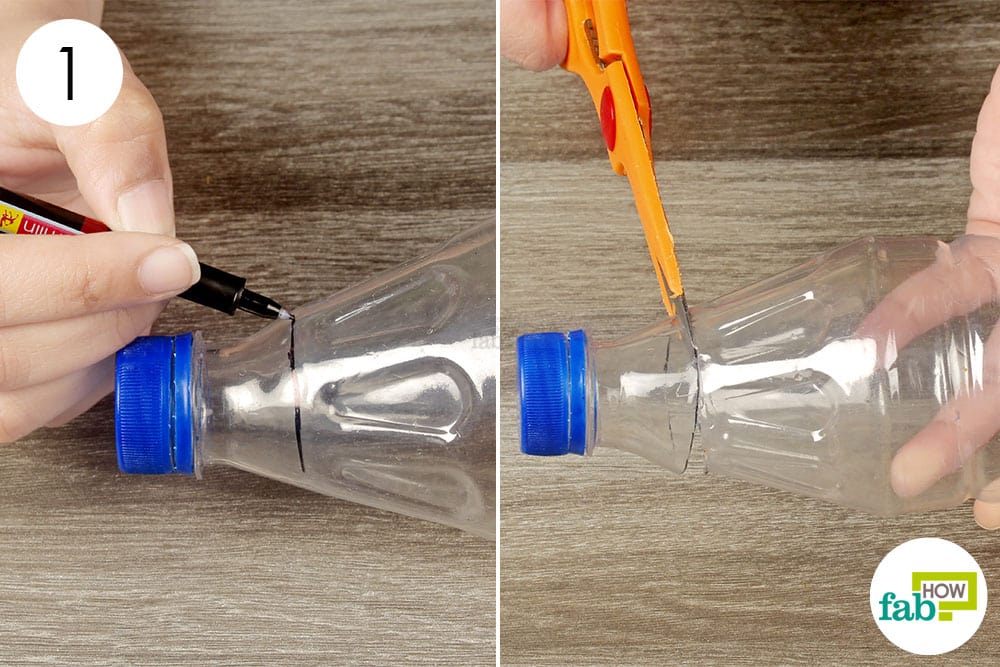
- Draw a circle 1 inch below the rim of the bottle.
- Use a scissors to cut along the marking to separate the bottleneck.
Step 2. Push the top of the plastic bag through the bottleneck

- Open the cap and push the top of the plastic bag with the food through the bottleneck.
- Fold the bag over the edges and seal it by screwing the cap back on the bottleneck.

Method 2: Tapered Candlesticks
If you’re into DIY candles, then you’ll certainly love this project. Plastic bottles can be upcycled to make pretty little candlesticks.
Things you’ll need:

- Plastic ½-liter bottles – 2
- Glue gun
- Marker
- Craft knife
Step 1. Cut off the bottlenecks

- Draw a circle around each bottle about 1 inch below the bottleneck. You can vary the height as per your liking.
- Cut along the marking to separate the bottlenecks.
Step 2. Glue the mouths of the bottles together and paint your candlestick

- Glue the bottlenecks together, attaching them at the narrow mouths where the caps would normally be.
- Once the glue is dry, spray paint and embellish your DIY plastic bottle candlestick with beads and ribbons.

Method 3: Utility Holder
You can upcycle plastic bottles into multipurpose utility holders. For example, kids can use them to store paint supplies or you can use them in the kitchen to hold cooking utensils.
Things you’ll need:

- Plastic bottles – 3 (two 1-liter bottles and one 2-liter bottle)
- Glue gun
- Craft knife
- Marker
Step 1. Cut out the required parts from the bottles

- On the two 1-liter bottles, cut off the bottlenecks.
- On the 2-liter bottle, cut off the bottleneck 3 inches down from the top. Also, cut off the base of the bottle, about 1 inch up from the bottom.
Step 2. Affix the small bottlenecks, glue on the base and decorate your holder

- On the upper cut portion of the 2-liter bottle, draw circles on either side that match the size of the smaller bottlenecks. Cut out the holes.
- Affix the bottlenecks from the 1-liter bottles into the holes using a glue gun.
- Glue the top and bottom pieces of the 2-liter bottle together.
- Let all the glue dry completely.
- Once dry, add your creative flair by painting and decorating the holder.

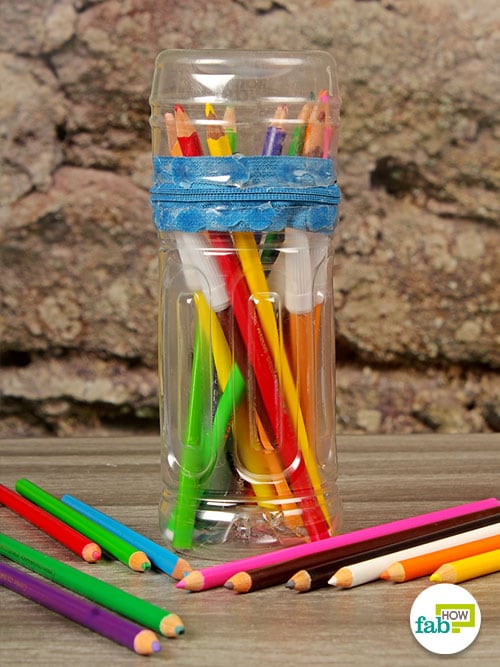
Method 4: Multi-purpose Zippered Container
You can convert plastic bottles into zippered plastic containers that you can easily carry around.
Things you’ll need:

- Plastic ½-liter bottles – 2
- Zipper – 1
- Glue gun
- Craft knife
Step 1. Cut off the bottom of one bottle and top of the other bottle

- Cut off the bottom of one bottle, about 1½ inches up from its base.
- Cut off the bottleneck of the other bottle, about 1½ inches down from the cap.
- For this project, you’ll only use the bottom portions of each bottle. You can save the bottlenecks for use in other projects.
Step 2. Glue the zipper onto the bottles and use
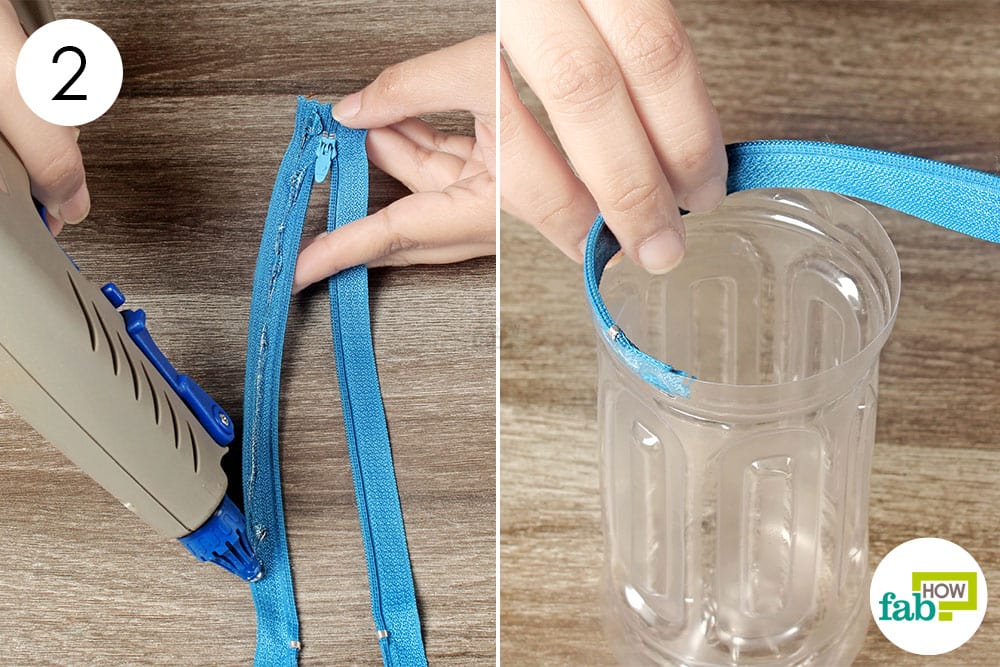
- Use a glue gun to secure the zipper to the inside edge of one bottle.
- Open the zipper, and glue the other half to the second bottle.
- Let the glue dry completely.
- Zip up the container, and it is ready to store your stuff.
Method 5: Egg Separator
Using a plastic bottle is a simple and cheap method that takes the hassle out of separating egg yolks and whites.
Things you’ll need:

- Small, clean plastic bottle
- Egg
- Knife
Step 1. Break open an egg and pour it into a bowl

- Carefully crack open an egg with a knife and pour it out into a bowl, keeping the egg yolk intact.
Step 2. Squeeze the bottle and suck up the yolk

- Using a clean, small plastic bottle, squeeze it to create suction.
- Without releasing, touch the rim of the bottle to the yolk. Be careful not to break the yolk.
- Gently release the bottle to suck up the egg yolk, leaving the whites behind in the bowl.
Step 3. Transfer the yolk to another plate

- Squeeze out the yolk onto another plate.
- Use the egg yolk or whites as needed.
Method 6: Bottle Cap Container for Small Items
If you are prone to misplacing tiny objects in your house, use plastic bottlenecks to create lightweight containers for storing things like memory cards, sim cards and other small items.
Things you’ll need:

- Plastic ½-liter bottles – 2
- Glue gun
- Craft knife
Step 1. Cut off the bottlenecks

- Use the craft knife to smoothly cut the bottlenecks off each bottle.
Step 2. Glue the bottlenecks together and decorate

- Apply glue on the open end of the bottlenecks and stick them together.
- Let the glue dry completely.
- Embellish it with pearls or other decorative material to create a pretty little container.

Method 7: Bird Feeder
If you like the idea of birds feeding in your backyard, try your hand at this DIY plastic bottle bird feeder.
Things you’ll need:

- Plastic 1-liter bottle
- Wooden spoons – 2
- Marker
- Craft knife
Step 1. Cut out holes to insert the perches

- Use a marker to draw a hole that is large enough to fit the handle of the wooden spoon and also allow the bird food to slide onto the spoon. Make the first hole about 2½ inches below the cap. Cut it out using the craft knife.
- Make a similar hole on the opposite side to extend the perch across the bottle. The opposite hole should be slightly higher to ensure that the perches slant.
- Make similar cuts about 3 inches below the first ones to insert another perch.
Step 2. Insert the perches and fill the bottle with bird food

- Insert the wooden spoons through the holes in a slanted position.
- Fill the bottle with bird food and hang it outside using a string looped around the cap of the bottle.
- You can also fill the bottom of the feeder with pebbles to ensure that the food does not go below the perches.

Method 8: Mobile Charging Basket
Hold on to those flat lotion bottles. They make a perfect holder for your phone while it charges.
Things you’ll need:

- Baby lotion bottle
- Craft knife
- Marker
Step 1. Mark up the bottle where you need to make cuts

- Mark the base of the bottleneck and draw a curved box on the upper half of the bottle. The box should be wide enough so that you can plug in the charger through it.
- Turn the bottle over and draw a horizontal line across it to mark the holder’s height.
- Extend the same line on the other side to outline the curved box, keeping ½-inch thickness. This will become your hanger.
Step 2. Cut along the lines and decorate the phone holder

- Use a craft knife to cut along the marked lines to get your phone holder shape.
- Decorate it with golden strands or paint it, as per your liking.

Method 9: Water Sprinkler
You can make your own inexpensive water sprinkler in a jiffy using a plastic bottle. It will come in handy whether you own a kitchen garden or just maintain a modest herb pot.
Things you’ll need:

- Plastic 2-liter bottle
- Drill
Single-Step Method: Drill holes in a plastic bottle and attach it to the water hose

- Use a drill to make multiple small holes along the length of a plastic 2-liter bottle.
- Attach the DIY plastic bottle water sprinkler to the garden hose, and it is ready to use.
Method 10: Squeeze Bottle
By converting the caps into nozzles, you can turn plastic bottles into inexpensive devices with which to pour or drizzle liquids. These DIY squeeze bottles can serve a wide variety of purposes.
Things you’ll need:

- Small plastic bottle
- Candle
- Toothpick
- Scissors
Step 1. Heat the cap

- Carefully heat the bottle cap over a candle flame to soften the plastic.
Step 2. Make a nozzle in the cap with a toothpick

- Once the plastic feels a bit pliable, push a toothpick through the cap to extend the softened plastic into a pointed nozzle.
- Let the cap cool completely.
Step 3. Snip off the excess plastic and put the cap back on the bottle

- Snip off the end of the nozzle with a scissors to make a perfect hole.
- Screw the cap back on the bottle and use.

Method 11: Jewelry Stand
Keep your jewelry in order and tangle-free by using the bottoms of plastic bottles as trays.
Things you’ll need:

- Plastic bottles – 4 (different sizes)
- Wooden stick
- Craft knife
- Glue gun
- Drill
Step 1. Cut the bottoms off the bottles and drill a hole in each one

- For this project, we used three ½-liter bottles and one 2-liter bottle.
- Cut off the bottom of each bottle as shallow as possible to give them a floral look.
- Drill a hole the same size as the wooden stick in the center of each piece.
Step 2. Insert the stick through the bottoms and secure them with glue

- Use the bottom of the 2-liter bottle as the base and add the other pieces above it, maintaining equal distance between each piece.
- Apply glue at the base of each bottom to secure them firmly to the stick.
- Let the glue dry completely.
- You DIY plastic bottle jewelry stand is ready to use.

Method 12: Piggy Bank
If you have children at home, encourage them to save money by depositing loose change into cute piggy banks made from plastic bottles. It’ll be a fun project to do together, and you can also teach your children that they can make many things they need far cheaper than buying them.
Be sure children are supervised while working with craft knives and scissors.
Things you’ll need:

- Plastic 2-liter bottle
- Glue gun
- Marker
- Craft knife
- A pair of scissors
Step 1. Cut out the middle portion of the bottle and glue the top and bottom together

- Use the craft knife to cut out the smooth, middle section of the bottle. For this project, you’ll use the base and the bottleneck. You can simply recycle the middle portion.
- Using scissors, make small slits along the circumference of the upper portion of the bottle.
- Apply glue on the outer edge of the bottom portion and attach the upper portion to it.
Step 2. Cut out the coin hole and decorate it

- Use the craft knife to make a coin hole on the top of the bottle.
- Cut out ear shapes from a cardboard carton and glue them onto the bottle.
- Spray paint the piggy bank with the color of your choice and attach artificial eyes and nostrils.
- Let the plastic bottle piggy bank dry completely before using it.

Method 13: Planters
You can repurpose old plastic bottles to create vertical gardens or succulent pots for indoor plants. Add flowering plants like periwinkle to these DIY plastic bottle planters or use them to grow an herb like sweet basil.
Things you’ll need:

- Plastic bottles – 2
- Craft knife
- Marker
Single-Step Method: Cut out desired shapes and use

- Mark and cut out a rectangle in the middle portion of the bottle. For a different shaped planter, you can cut off the bottom of the bottle about 4 inches up from the base.
- Make a hole at the bottom of the planter to facilitate water drainage.
- Be creative and decorate them as you like. If you want to make bunny planters, carve out bunny ears. Spray paint it with your favorite color and draw on the eyes and mouth.
- Fill the bottle with soil and plant the sapling.

Method 14: Gift Boxes
Believe it or not, you can transform soda bottles into beautiful gift boxes by simply cutting and folding them. Here are two options for making these unique gift boxes.
Things you’ll need:

- Plastic bottle (use varying sizes as needed) – 2
- Craft knife
- Marker
- A pair of scissors
#Semi-round gift box with feet

- Use a craft knife to cut off the lower end of the plastic bottle, about 3 inches up from the bottom.
- Use scissors to make 5 vertical slits to serve as flaps of the box. Each slit should be at least 1-inch deep and spaced out equally.
- Fold in each flap to close the box.
- Decorate it with a ribbon.
#Square plastic gift box

- Cut out the smooth middle section of each bottle.
- Press the cut out part from 2 sides to form a convex shape. Rotate at 90 degrees and squeeze again to form a square shape. Repeat the same for the other piece to get 2 squares.
- Insert 1 square into the other, so that open sides face the closed side to form a box.
- Tie a ribbon around it for decoration.

Method 15: Stink Bug Trap
Get rid of annoying stink bugs from your house with this homemade bug trap made with plastic bottle. It uses light as a bait to lure stink bugs and trap them inside the bottle.
Things you’ll need:

- Plastic 2-liter bottle
- Black electrical tape
- Craft knife
- LED light that can fit into the bottle
Step 1. Cut off the upper portion of the bottle and cover the base with tape

- Cut off the bottleneck, 2 inches down from the top. Set the bottleneck aside.
- Wrap electrical tape around the lower portion, covering up to 3 inches from the base.
- Affix 4 strips of tape vertically, along the length of the bottle and placed at equal distance from each other. These will serve as crawl-paths that the stink bugs can grip onto.
Step 2. Install the LED light inside the bottle

- Using the craft knife, make a small cut in the bottom of the bottle for the light’s wiring.
- Insert the LED light into the bottle with the light facing upward.
- Pull the wiring out through the hole made in the bottom.
Step 3. Secure the inverted neck into the lower part of the trap and turn on the light

- Remove the cap and turn the bottleneck upside down.
- Place it over the top of the lower portion of the bottle, and secure it in place with the electrical tape.
- Place the stink bug trap in the infested area.
- Turn off the surrounding lights and plug in the trap’s LED light. If using it outdoors, turn it on after sunset.
- Carefully dispose of the trapped stink bugs the next morning.

I had a bunch of used plastic bottles lying around, I had no idea they could be put to so many uses, and then landed on your page while searching for it !!!
Kudosss people !!! with these easy step by step tutorial, I made my own cute little piggy bank!!!
Attached image: